
By Fawaz Ghali
Director of Developer Experience
Fawaz Ghali is the Director of Developer Experience at Hazelcast with more than 22 years of experience in DevRel, cloud, enterprise software development and deployment, ML/AI and real-time intelligent applications, management and leadership. He holds a PhD in Computer Science and has worked in the private sector as well as academia and research. He has published over 45 scientific peer-reviewed papers in the fields of ML/AI, data science and cloud computing on Google Scholar. Fawaz is a renowned expert with 200+ talks and presentations at global events and conferences.
View all blogs by the authorSep 11, 2023
Building Real-time Applications to Process Wikimedia Streams using Kafka and Hazelcast
In this tutorial, developers, solution architects, and data engineers can learn how to build high-performance, scalable, and fault-tolerant applications that react to real-time data using Apache Kafka and Hazelcast.
We will be using Wikimedia as a real-time data source. Wikimedia provides various streams and APIs (Application Programming Interfaces) to access real-time data about edits and changes made to their projects. For example, this source provides a continuous stream of updates on recent changes, such as new edits or additions to Wikipedia articles. Developers and solution architects often use such streams to monitor and analyze the activity on Wikimedia projects in real-time or to build applications that rely on this data, like this tutorial. Kafka is great for event streaming architectures, continuous data integration (ETL), and messaging systems of record (database). Hazelcast is a unified real-time stream data platform that enables instant action on data in motion by uniquely combining stream processing and a fast data store for low-latency querying, aggregation, and stateful computation against event streams and traditional data sources. It allows you to build resource-efficient, real-time applications quickly. You can deploy it at any scale, from small-edge devices to a large cluster of cloud instances.
This tutorial will guide you through setting up and integrating Kafka and Hazelcast to enable real-time data ingestion and processing for reliable streaming processing. By the end, you will have a deep understanding of how to leverage the combined capabilities of Hazelcast and Kafka to unlock the potential of streaming processing and instant action for your applications.
So, let’s get started!
Wikimedia Event Streams in Motion
First, let’s understand what we are building: Most of us use or read Wikipedia, so let’s use Wikipedia’s recent changes as an example. Wikipedia receives changes from multiple users in real-time, containing details about the change such as title, request_id, URI, domain, stream, topic, type, user, topic, title_url, bot, server_name, and parsedcomment. We will read recent changes from Wikimedia Event Streams. Event Streams is a web service that exposes streams of structured event data in real time. It does it over HTTP with chunked transfer encoding in accordance with the Server-Sent Events protocol (SSE). Event Streams can be accessed directly through HTTP but are often used through a client library. An example of this is a “recentchange”: which can be accessed via:
https://stream.wikimedia.org/v2/stream/recentchange
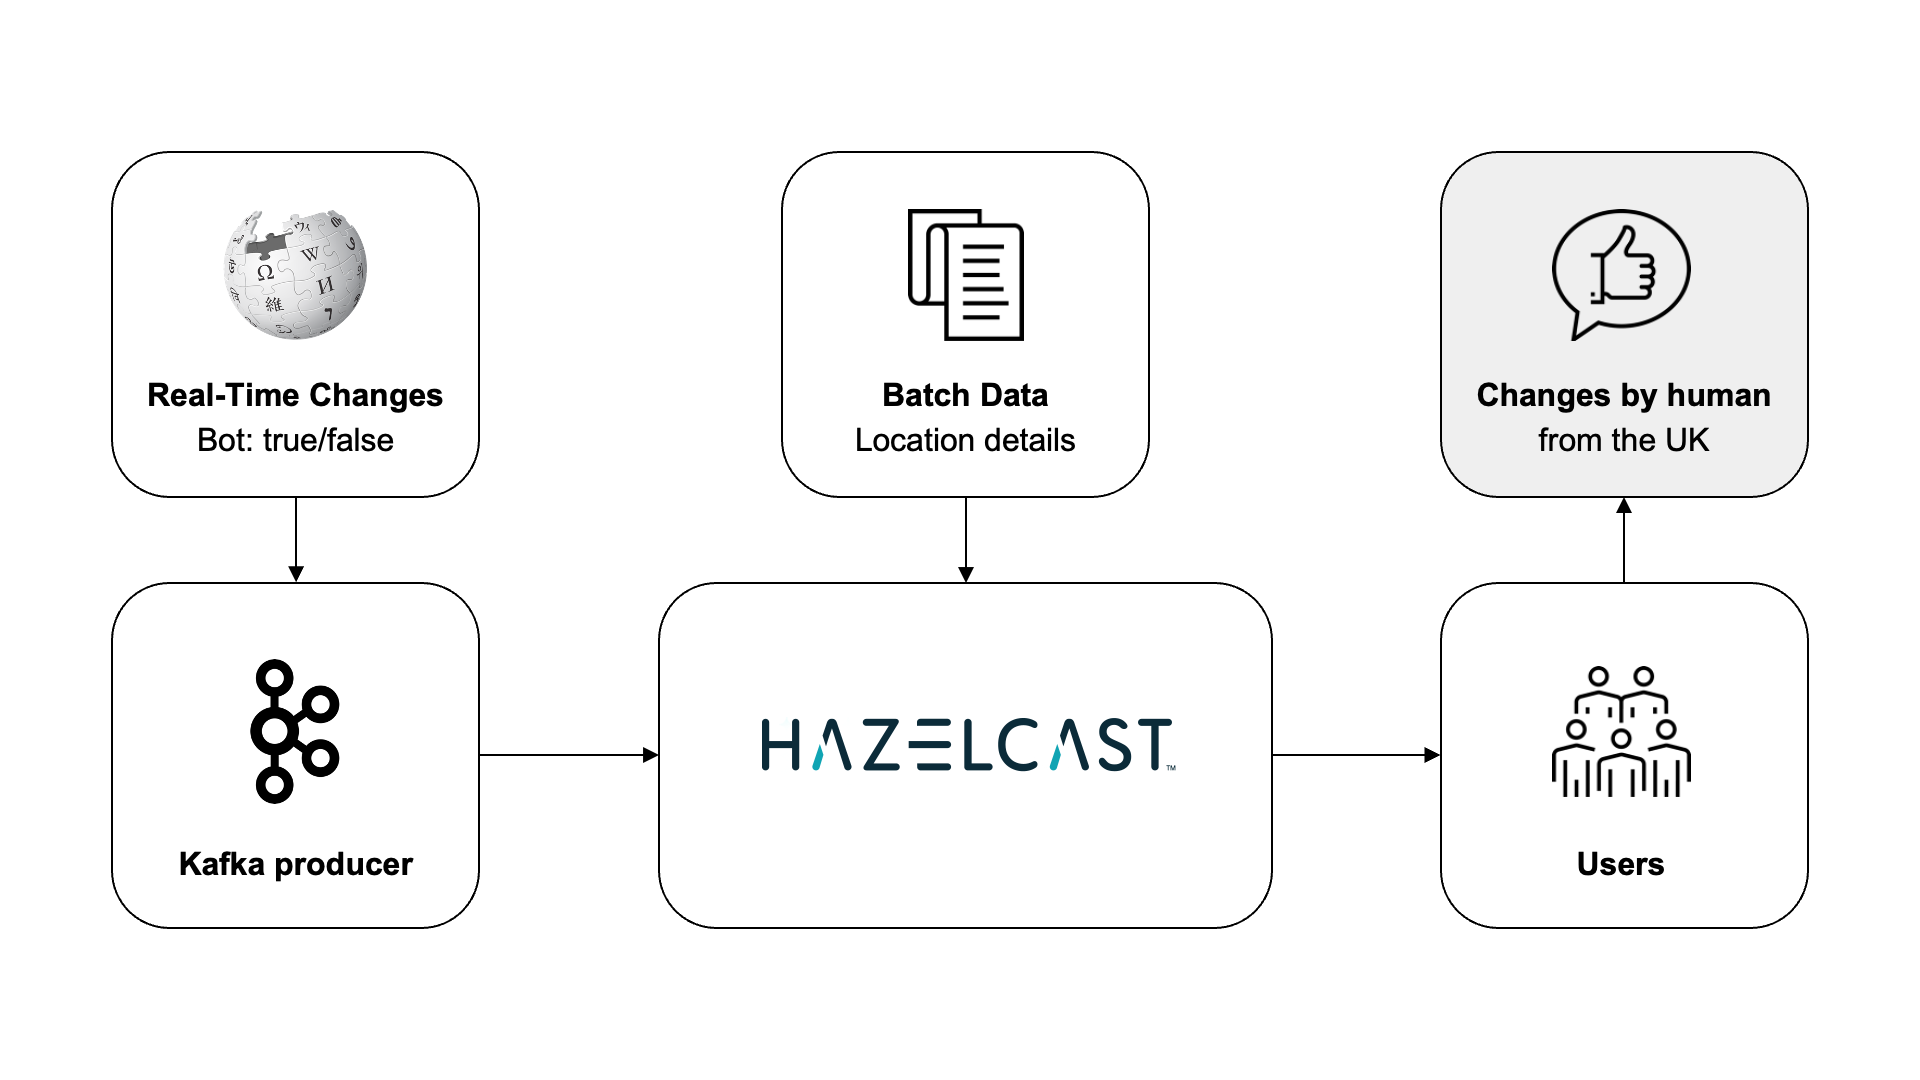
But what if you want to process or enrich changes in real-time? For example, determine if a recent change is generated by a bot or human. How can you do this in real-time? There are multiple options, but if you are interested in simplicity and performance, we’ll show you how to use Kafka to transport data and Hazelcast for real-time stream processing. Here’s a quick diagram of the data pipeline architecture:
Prerequisites
-
- If you are new to Kafka or you’re just getting started, I recommend you start with Kafka Documentation.
- If you are new to Hazelcast or you’re just getting started, I recommend you start with Hazelcast Documentation.
- For Kafka, you need to download Kafka, start the environment, create a topic to store events, write some events to your topic, and finally read these events. Here’s a Kafka Quick Start.
- For Hazelcast, you can use either the Platform or the Cloud. I will use a local cluster.
Step #1: Start Kafka
Run the following commands to start all services in the correct order:
# Start the ZooKeeper service
$ bin/zookeeper-server-start.sh config/zookeeper.properties
Open another terminal session and run:
# Start the Kafka broker service
$ bin/kafka-server-start.sh config/server.properties
Once all services have successfully launched, you will have a basic Kafka environment running and ready to use.
Step #2: Create a Java application project
The pom.xml should include the following dependencies to run Hazelcast and connect to Kafka:
<dependencies>
<dependency>
<groupId>com.hazelcast</groupId>
<artifactId>hazelcast</artifactId>
<version>5.3.1</version>
</dependency>
<dependency>
<groupId>com.hazelcast.jet</groupId>
<artifactId>hazelcast-jet-kafka</artifactId>
<version>5.3.1</version>
</dependency>
</dependencies>
Step #3: Create a Wikimedia Publisher class
The class reads from a URL connection, creates a Kafka Producer, and sends messages to a Kafka topic:
public static void main(String[] args) throws Exception {
String topicName = "events";
URLConnection conn = new URL
("https://stream.wikimedia.org/v2/stream/recentchange").openConnection();
BufferedReader reader = new BufferedReader
(new InputStreamReader(conn.getInputStream(), StandardCharsets.UTF_8));
try (KafkaProducer<Long, String> producer = new KafkaProducer<>(kafkaProps())) {
for (long eventCount = 0; ; eventCount++) {
String event = reader.readLine();
producer.send(new ProducerRecord<>(topicName, eventCount, event));
System.out.format("Published '%s' to Kafka topic '%s'%n", event, topicName);
Thread.sleep(20 * (eventCount % 20));
}
}
}
private static Properties kafkaProps() {
Properties props = new Properties();
props.setProperty("bootstrap.servers", "127.0.0.1:9092");
props.setProperty("key.serializer", LongSerializer.class.getCanonicalName());
props.setProperty("value.serializer", StringSerializer.class.getCanonicalName());
return props;
}
Step #4: Create a Main stream processing class
This class creates a pipeline that reads from a Kafka source using the same Kafka topic; then it filters out messages that were created by bots (bot:true) and keeps only messages created by humans. It sends the output to a logger.
public static void main(String[] args) {
Pipeline p = Pipeline.create();
p.readFrom(KafkaSources.kafka(kafkaProps(), "events"))
.withNativeTimestamps(0)
.filter(event-> Objects.toString(event.getValue()).contains("bot\":false"))
.writeTo(Sinks.logger());
JobConfig cfg = new JobConfig().setName("kafka-traffic-monitor");
HazelcastInstance hz = Hazelcast.bootstrappedInstance();
hz.getJet().newJob(p, cfg);
}
private static Properties kafkaProps() {
Properties props = new Properties();
props.setProperty("bootstrap.servers", "127.0.0.1:9092");
props.setProperty("key.deserializer", LongDeserializer.class.getCanonicalName());
props.setProperty("value.deserializer", StringDeserializer.class.getCanonicalName());
props.setProperty("auto.offset.reset", "earliest");
return props;
}
Step #5: Enriching a stream
If you want to enrich real-time messages with batch or static data such as location details, labels, or some features, you can follow the next step:
- Create a Hazelcast Map and load static data into it.
- Use the Map to enrich the Message stream using
mapUsingIMap
Conclusion
In this post, we explained how to build a real-time application to process Wikimedia streams using Kafka and Hazelcast. Hazelcast allows you to build resource-efficient, real-time applications quickly. You can deploy it at any scale, from small-edge devices to a large cluster of cloud instances. A cluster of Hazelcast nodes shares the data storage and computational load, which can dynamically scale up and down. Referring to the Wikimedia example, it means that this solution is reliable, even when significantly higher volumes of users are making changes to Wikimedia.
We look forward to your feedback and comments about this blog post! Share your experience with us in the Hazelcast community Slack, the Hazelcast GitHub repository and on Twitch. Hazelcast also runs a weekly live stream on Twitch, so give us a follow to get notified when we go live.
Interested in learning more?
- Join Free Webinar: Pizza Delivery in Motion brought to you by Redpanda and Hazelcast
- Meet with us at Current 2023