
Principal Architect
With over 30 years of industry experience, Neil has designed, developed, debugged, and supported software systems for numerous customers large and small. Initially, a C and assembler programmer, most of the last 20 years have been Java-based, with a focus on distributed systems, data grids, and stream processing. Neil is an occasional committer to the Hazelcast code base, with special interest on GoLang.
View all blogs by the authorSep 3, 2019
Running Apache Beam on Hazelcast Jet
In June 2019, we announced the inclusion of Hazelcast Jet as a runner for Apache Beam.
Now it’s time for an example showing how it’s done. As a bonus, it’s not “Word Count.”
IoT Data
The data we will use is a series of 2,000 GPS points and time offsets:
# Latitude, Longitude, Time-Offset
45.417,8.179,1629
45.417,8.178,1630
45.416,8.178,1631
45.416,8.177,1632
45.415,8.176,1633
These points are real data. They come from a trip on Italy’s famous Frecciarossa (Red Arrow) train from Milan to Turin.
Since we have real data, we can solve some real problems. Since trains move, they are connected wirelessly. Delivering the position over wireless networks may mean some locations arrive twice or out of order. In some cases, such as when a train is in a tunnel, the positions may not arrive at all.
The Example Application
This example application mainly does two things:
- It uses a Beam pipeline to enrich the stream of GPS points. They are parsed and reformatted from CSV to JSON, and then windowing is used to drop some out of sequence points. This is not the most sophisticated Beam example, but that’s not the objective.
- These points are plotted dynamically on a map to make things more visual using JavaScript and a WebSocket. This is done as they arrive using stream processing, not batch processing.
Beam and the Jet Runner
The basic concept of Apache Beam is that the definition of a processing pipeline is independent and agnostic of the execution platform.
We define a Beam pipeline and choose to run it on Hazelcast Jet.
We could choose to run it with something other than Hazelcast Jet, but we won’t.
Please note that although Beam is platform-independent, not all platforms implement all features. For more information on feature compatibility, please refer to the Apache Beam Capability Matrix.
Running the Example
This example consists of four processes running simultaneously. As it uses file watching logic, we also want to run them all from the same directory to keep things simple.
Note: Using the same directory is crucial to making this demo work. In order to keep the example simple, Step 4 writes to the directory that Steps 2 and 5 are expecting. You can change this in the code if you want, but if you don’t wish to, be sure to run all commands from the same directory.
1. Build
Download hazelcast-jet-demos.
From the top level of the “train-track” folder run this command to build:
mvn clean install
2. Run the Jet Grid
Run this command to start one Jet grid process, and leave it running:
java -jar train-track-grid/target/train-track-grid.jar
This will create a Jet grid running on port 8701 on your machine. The grid is named frecciarossa.
If you have access to either or both the Hazelcast IMDG Management Center and Hazelcast Jet Management Center, you have additional ways to monitor the activity.
The Jet grid is where the Beam job will run. Although we won’t do so here, the Jet grid could contain several Jet processes, spread across multiple machines, making full use of all available CPUs.
3. Run the Web UI
Start the web UI using this command, and leave it running:
java -jar train-track-web-ui/target/train-track-web-ui.jar
Bring up this page in a browser:
http://localhost:8085/
Assuming you have an Internet connection, the browser will download a map of Milan to display on the screen.
This process connects to the Hazelcast Jet cluster to find the location of the train. We won’t see the position of the train yet as we haven’t started the data feed, which should appear after Step 5 runs.
4. Create the Data Feed
Next, run this command:
java -jar train-track-data-feed/target/train-track-data-feed.jar
The command will output four GPS points per second to the screen, and into a file named “beam-input” in the current directory.
There are over 2,000 points recorded, so this job will take more than fifteen minutes to complete. The actual train trip from Milan to Turin takes 65 minutes.
Don’t wait for it to complete; as soon as output appears, proceed to Step 5.
5. Run the Beam Job
Finally, run this command:
java -jar train-track-beam-runner/target/train-track-beam-runner.jar
Be sure to select “train-track-beam-runner/target/train-track-beam-runner.jar” not “train-track-beam-runner/target/train-track-beam-runner-shaded.jar“.
This step will submit a Beam job to run in the Hazelcast Jet process started in Step 2.
It will read the file “beam-input” being produced by the process started in Step 4.
It will produce files named “beam-output*” with the enriched GPS information. In addition to the latitude and longitude, we should also have the time in a more human-readable format.
6. Success?
If you look at the “beam-input” file, you should see a sequence of lines for the GPS points:
45.464,8.438,1364
45.464,8.437,1365
If you look at the “beam-output*” files, you should see the enriched output for these GPS points:
{ "input-point": "953", "latitude": "45.464", "longitude": "8.438", "timestamp": "1565644594246", "timeprint": "22:16:34" }
{ "input-point": "954", "latitude": "45.464", "longitude": "8.437", "timestamp": "1565644594496", "timeprint": "22:16:34" }
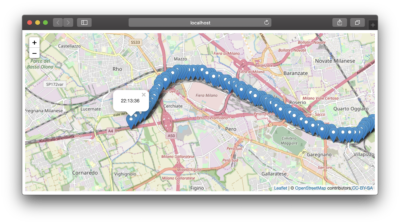
Looking at the browser, you should see it updating as the points are plotted on the map. It will look something like this:

If you don’t get these three, something went wrong. It’s worth finding out where and why.
Show Me the Magic
How does this work?
The cleverness is in the “train-track-beam-runner” module, and specifically this coding:
public static void main(String[] args) {

    JetPipelineOptions jetPipelineOptions
        = PipelineOptionsFactory.create().as(JetPipelineOptions.class);

    jetPipelineOptions.setCodeJarPathname("train-track-beam-runner/target/train-track-beam-runner-shaded.jar");
    jetPipelineOptions.setJetDefaultParallelism(1);
    jetPipelineOptions.setJetGroupName("frecciarossa");
    jetPipelineOptions.setJetServers("127.0.0.1:8701");
    jetPipelineOptions.setJobName(MyBeamJob.class.getSimpleName());
    jetPipelineOptions.setRunner(JetRunner.class);

    Pipeline pipeline = MyBeamJob.build(jetPipelineOptions);

    pipeline.run();
}
This does three things:
- It creates the object “
jetPipelineOptions” which contains the specifics for running a Beam job in Hazelcast Jet. The essential parts are the Jar file that contains the code to run, and “JetRunner” as the thing that runs it. - It then creates the Beam processing pipeline, passing in the “
jetPipelineOptions” as a parameter to be held within the processing job. - Lastly, it uses the “
pipeline.run()” command to send the job to the execution engine for processing. We don’t wait on the job to complete, fire, and forget.
Understanding the Example
How does this really work?
This next section provides a more detailed explanation for the curious; skip on to the summary if you prefer. If not, here’s how the five modules in this demo interact:
Data Feed
The first job in the application is train-track-data-feed.
This has nothing to do with Hazelcast Jet or Apache Beam.
All it does is write a series of data points, from the code file “FrecciaRossa.java” to a file named “beam-input” in the top-level directory.
The GPS points are already captured, but we’re trying to simulate a real feed coming in.
The filename “beam-input” is meant to imply it is the input file for Beam processing. Of course, it’s also the output file from this module.
In the instructions, this is Step 4. But it doesn’t have a dependency on Steps 2 or 3.
Beam Job, train-track-beam-job
This module is the whole point of the example; it defines processing logic using the Apache Beam Java SDK. There is no reference to Hazelcast Jet in this module.
The processing reads from a file called “beam-input” and writes to “beam-output“. Between this read and write, the data is enriched.
Beam Job Maven Dependency
The Maven dependency for this module is:
<dependency>
    <groupId>org.apache.beam</groupId>
    <artifactId>beam-sdks-java-core</artifactId>
</dependency>
It has no reliance on Hazelcast Jet; everything is standard Apache Beam.
Beam Job Data Enrichment
The input is in CSV format, for the latitude, longitude, and time offset.
The time offset is in relation to when the train left Milan; the units are seconds.
The first point is “45.487,9.205,0000“. The latitude is 45.487 North, the longitude is 9.205 West, approximately here in Milan. The time offset is zero as this is the first point.
The last point is “45.059,7.675,3762“. The latitude is 45.059 North, the longitude is 7.675 West, approximately here in Turin. The time offset is 3762 seconds, 62 minutes after recording began.
Beam Runner, train-track-beam-runner
The Beam runner job is pretty trivial. As shown earlier, it is just one class. What that class does is send a Jar file to the Jet grid.
It has a dependency on the Beam pipeline that it submits, “train-track-beam-job“:
    <dependency>
        <groupId>${project.groupId}</groupId>
        <artifactId>train-track-beam-job</artifactId>
        <version>${project.version}</version>
    </dependency>
Shaded Jar
In the “pom.xml” file, you’ll see that we use “maven-shade-plugin“.
This takes this module (“train-track-beam-runner“) and all its dependencies (especially “train-track-beam-runner“), expands them out, and then re-bundles them as a single unit.
The result “train-track-beam-runner-shaded.jar” is more of a Jar that contains “.class” files than a Jar that contains “.jar” files, making it easier for Beam to find the classes.
We take a simplistic approach here. One of the bundled dependencies is Hazelcast Jet itself. When we submit this bundled Jar to the Hazelcast Jet grid, it will already have these classes. As the versions are the same, it does no harm, but we could make the configuration more selective at the expense of simplicity.
Jet Pipeline Options
In the main class, six options are used to configure the deployment:
-
jetPipelineOptions.setCodeJarPathname("train-track-beam-runner/target/train-track-beam-runner-shaded.jar");This is the Jar file we wish to send to the Jet cluster to execute and has been assembled using the “
maven-shade-plugin“.It needs to include the pipeline job classes, plus some of the dependent classes used, like “
JetRunner“. Due to the basic configuration used for shading, this Jar also contains some unnecessary classes. -
jetPipelineOptions.setJetDefaultParallelism(1);
For Jet to achieve high performance, a job will generally run multiple instances in each JVM, and a Jet cluster will have multiple JVMs. So for each, the processing will be highly parallel.
But we only have one input file to process, so we reduce down the parallelism to make things simpler to understand.
-
jetPipelineOptions.setJetGroupName("frecciarossa");This is the cluster name for the Jet cluster we wish to connect. No password credentials are needed in this example, as security is not enabled.
-
jetPipelineOptions.setJetServers("127.0.0.1:8701");This option lists *some* of the Jet servers in the cluster to attempt a connection. The first reply includes the addresses of all the others, and then connections are opened to them, too.
Generally, 2 or 3 are enough places to try, but since this example only uses one server, that’s all we should specify.
-
jetPipelineOptions.setJobName(MyBeamJob.class.getSimpleName());
For visualization on the Hazelcast Jet Management Center, it is useful if the job has a name.
-
jetPipelineOptions.setRunner(JetRunner.class);
This is the class that will run the Beam pipeline against the Jet grid. For now, it will always be set to “
JetRunner“.
Jet Grid, train-track-grid
The Jet grid for this example is relatively trivial. A single node is all we need. The group name for this grid (of 1) is frecciarossa. It runs on port 8701 to avoid a clash with any other grid on the default port of 5701, which may also be present.
When this grid starts, it doesn’t know of the Beam job and therefore won’t be running it. Indeed, it doesn’t have any of the Beam classes in its classpath (check the “pom.xml“), until the “train-track-beam-runner” sends these classes to the grid.
The one non-standard piece of the grid is a Jet job (not a Beam job) configured to run at start-up, called FileWatcher.
FileWatcher Job
The class “FileWatcher.java” defines a Jet job to run when the grid starts. It only contains two effective lines.
pipeline.drawFrom(FileWatcher.buildFileWatcherSource()).withoutTimestamps()
        .drainTo(FileWatcher.buildTopicSink());
What this job does is look for lines in files named “beam-output*” and publish those lines to a Hazelcast topic named treno.
This is just a bit of plumbing.
The Jet job detects each line written by the Beam job, and that line is written to a Hazelcast topic for the Web UI. The Beam job can’t do this itself, as the Beam job doesn’t know it is running in Hazelcast Jet.
Web UI, train-track-web-ui
The last module, train-track-web-ui, does some cool stuff, but it’s not much to do with Hazelcast.
The Java part of the coding is again just a bit of plumbing. What it does is subscribe to the Hazelcast topic “treno” that “train-track-grid” is publishing to, and pass the message payload received through a WebSocket to JavaScript running in your browser.
The Web UI runs on port 8085, to avoid potential clashes with Hazelcast IMDG Management Center on 8080 or Hazelcast Jet Management Center on 8081.
All you need to do is point your browser at:
http://localhost:8085/
In the browser, OpenStreetMap is used to do the plotting. The code is mostly just this:
function onMessage(message) {
	var json = JSON.parse(message);
	var latitude = json.latitude;
	var longitude = json.longitude;
	var timeprint = json.timeprint;

	var myMarker = L.marker([latitude, longitude]);
	myMarker.bindPopup('<p>' + timeprint + '</p>');
	myMarker.addTo(map);

	myMarker.openPopup();
}
When a message is received from the WebSocket, it is parsed as JSON and the fields with the text names latitude, longitude, and timeprint are extracted.
A marker point is plotted on the map using the latitude and longitude, and a text field is added to this marker containing the time of day.
Data arrives up to four points a second, with the time of day shown on the most recent point. Old points are still present, so we can see where the train has been.
Gaps in the points shown might be a tunnel, when there was no signal to deliver the message, or some other fault.
Tracing the Data Flow
So, if all four processes are running, what will happen is roughly this:
“train-track-data-feed” will write one CSV line per second to a file named “beam-input“. e.g.,
45.059,7.675,3762
“train-track-beam-job” running in the Jet grid will read that one CSV line from “beam-input” and write JSON to “beam-output*“:
{ "input-point": "2057", "latitude": "45.059", "longitude": "7.675", "timestamp": "1565645192996", "timeprint": "22:26:32" }
The FileWatcher job running in the Jet grid will read the one JSON line from “beam-output*” and publish it unchanged to the topic “treno“:
{ "input-point": "2057", "latitude": "45.059", "longitude": "7.675", "timestamp": "1565645192996", "timeprint": "22:26:32" }
The “train-track-web-ui” subscribes to the “treno” topic, and passes this JSON on through a web socket to your browser:
{ "input-point": "2057", "latitude": "45.059", "longitude": "7.675", "timestamp": "1565645192996", "timeprint": "22:26:32" }
Code in the browser plots the JSON on a map!
You’ll note that only Beam really does any proper processing. Everything else is just moving data from place to place without enrichment, aggregation, or the like.
Summary
This example shows how to create and execute an Apache Beam processing job in Hazelcast Jet. It also subliminally teaches you the location of two cities in northern Italy.
You can define a Beam processing job in Java just as before.
If you have Apache Beam 2.14 or later, the new “JetRunner” allows you to submit this to Hazelcast Jet for execution. We do it here with ten lines of code, though you could trim that a bit.
And that’s it! You can run an Apache Beam job in Hazelcast Jet or elsewhere. The trade-off is that you don’t get to use all the power of Jet specifics, which is the sacrifice necessary to go with implementation-independent processing.
You’ll find the example code here.