
By Rafal Leszko
Cloud Software Engineer
Rafał is a passionate software engineer, trainer, conference speaker, and author of the book, Continuous Delivery with Docker and Jenkins. He specializes in Java development, cloud environments, and continuous delivery. Prior to joining Hazelcast, Rafał worked with a variety of companies and scientific organizations, including Google, CERN, and AGH University of Science and Technology.
View all blogs by the authorJan 27, 2020
How to Set Up Your Own On-Premises Hazelcast on Kubernetes
Hazelcast loves Kubernetes. Thanks to the dedicated Hazelcast Kubernetes plugin, you can use dynamic auto-discovery. Hazelcast on Kubernetes can also run in multiple topologies: embedded, client-server, or as a sidecar. What’s more, thanks to the Helm package manager and the dedicated Hazelcast Helm Chart, you can deploy a fully functional Hazelcast server in literary minutes. I already described it in the Hazelcast Helm Chart blog post, which covered the scenario when the client and the server were both deployed in the same Kubernetes cluster.
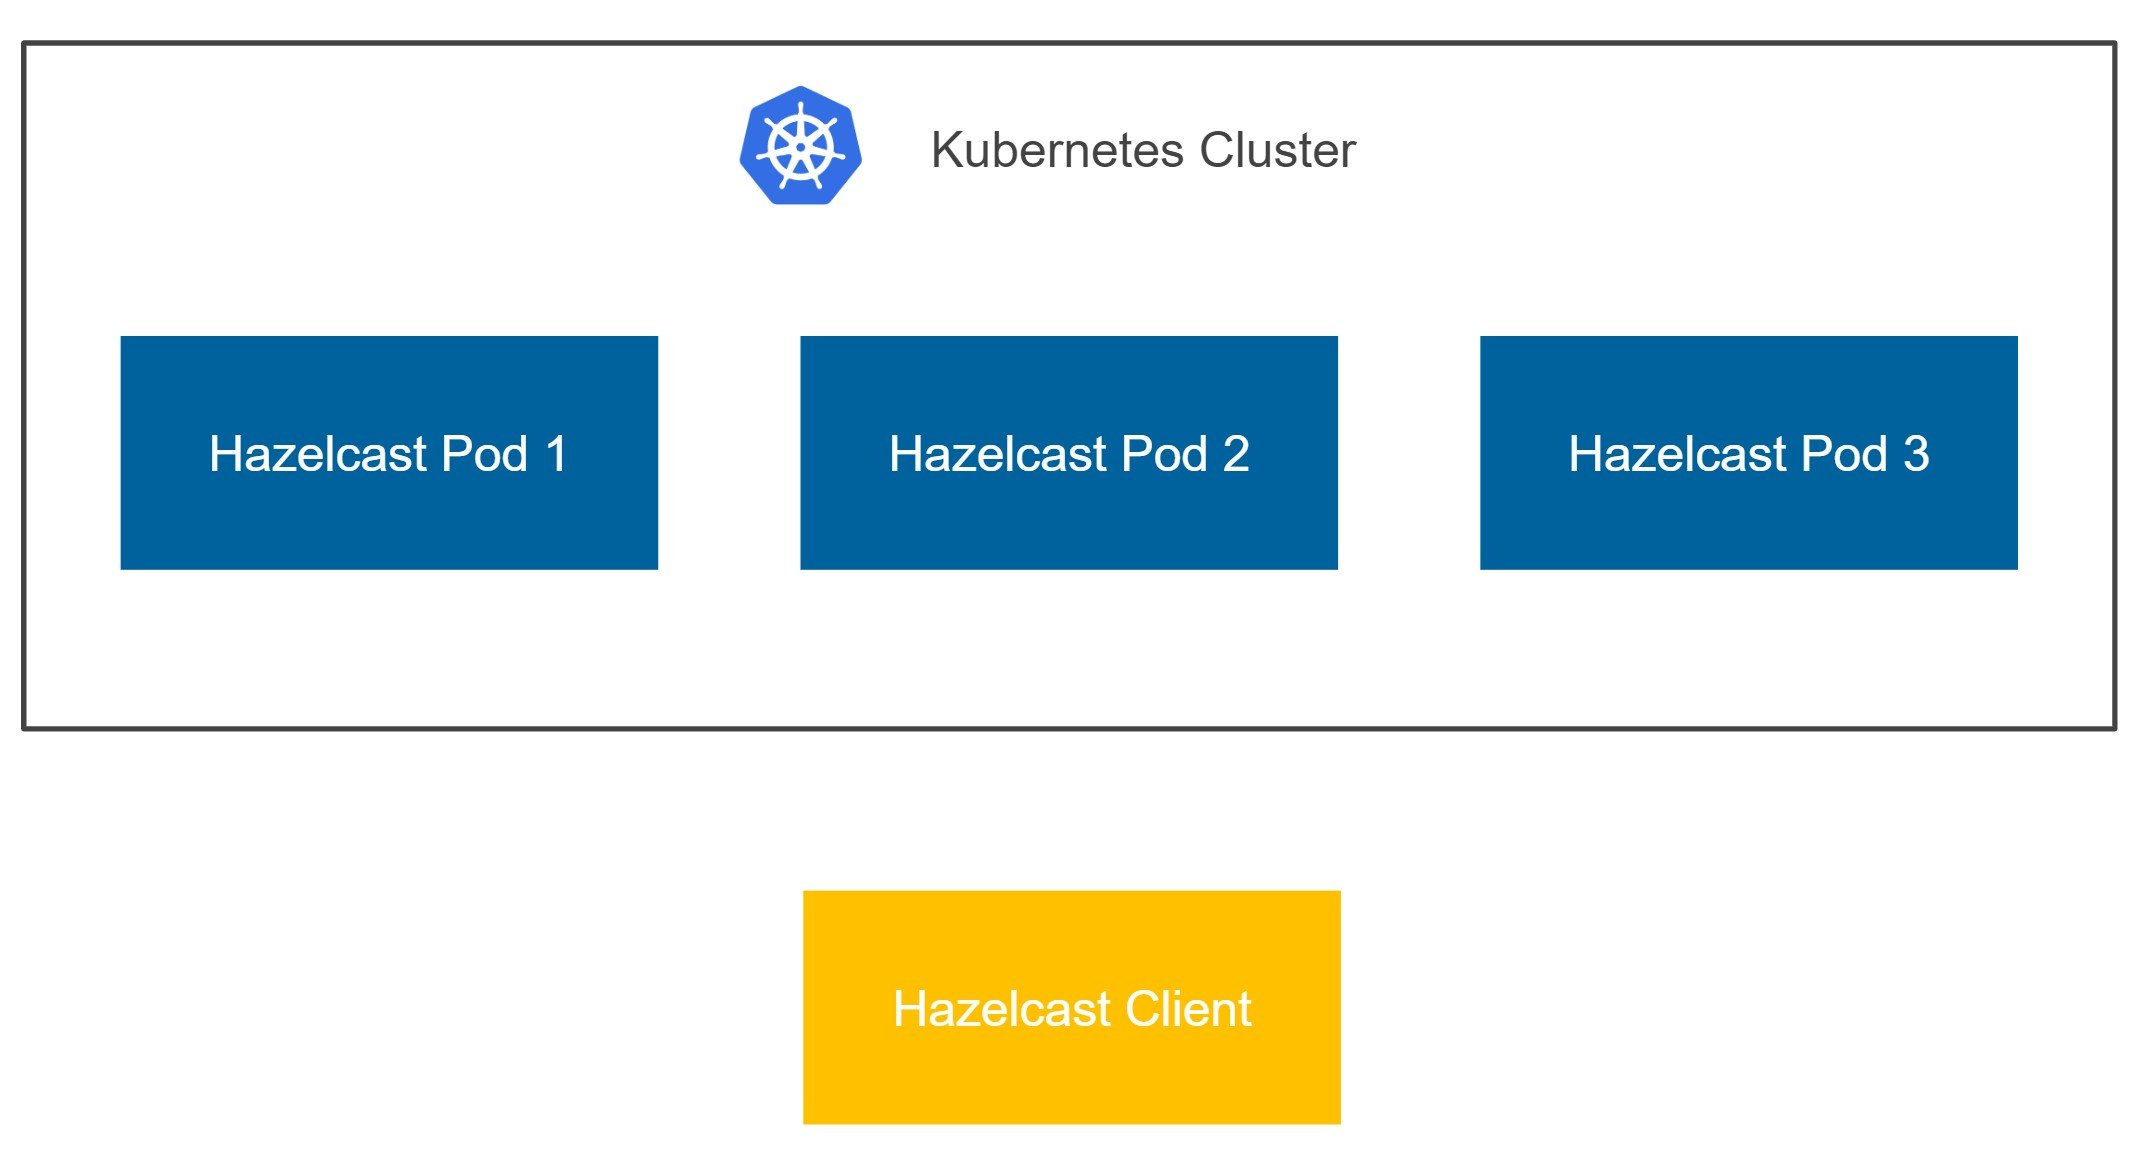
In this blog post, let’s focus on a more difficult scenario, where you’d like to set up your own on-premises Hazelcast on a Kubernetes cluster and then use it with a client located outside that cluster.
The client can be located anywhere—on your laptop, on another Kubernetes cluster, or on any other server. It doesn’t matter. What matters is that it’s not the same Kubernetes cluster. As you can imagine, deploying the Hazelcast cluster is the easy part, but connecting with the client can be a little challenging. Let’s break it into two approaches you may want to use: Unisocket Client and Smart Client.
Unisocket Client
The simplest possible scenario is to deploy the Hazelcast cluster on Kubernetes and expose all Hazelcast pods with one LoadBalancer (or NodePort) service. With that approach, we piggyback on the standard Kubernetes mechanism, which automatically load balances the traffic to Hazelcast members.
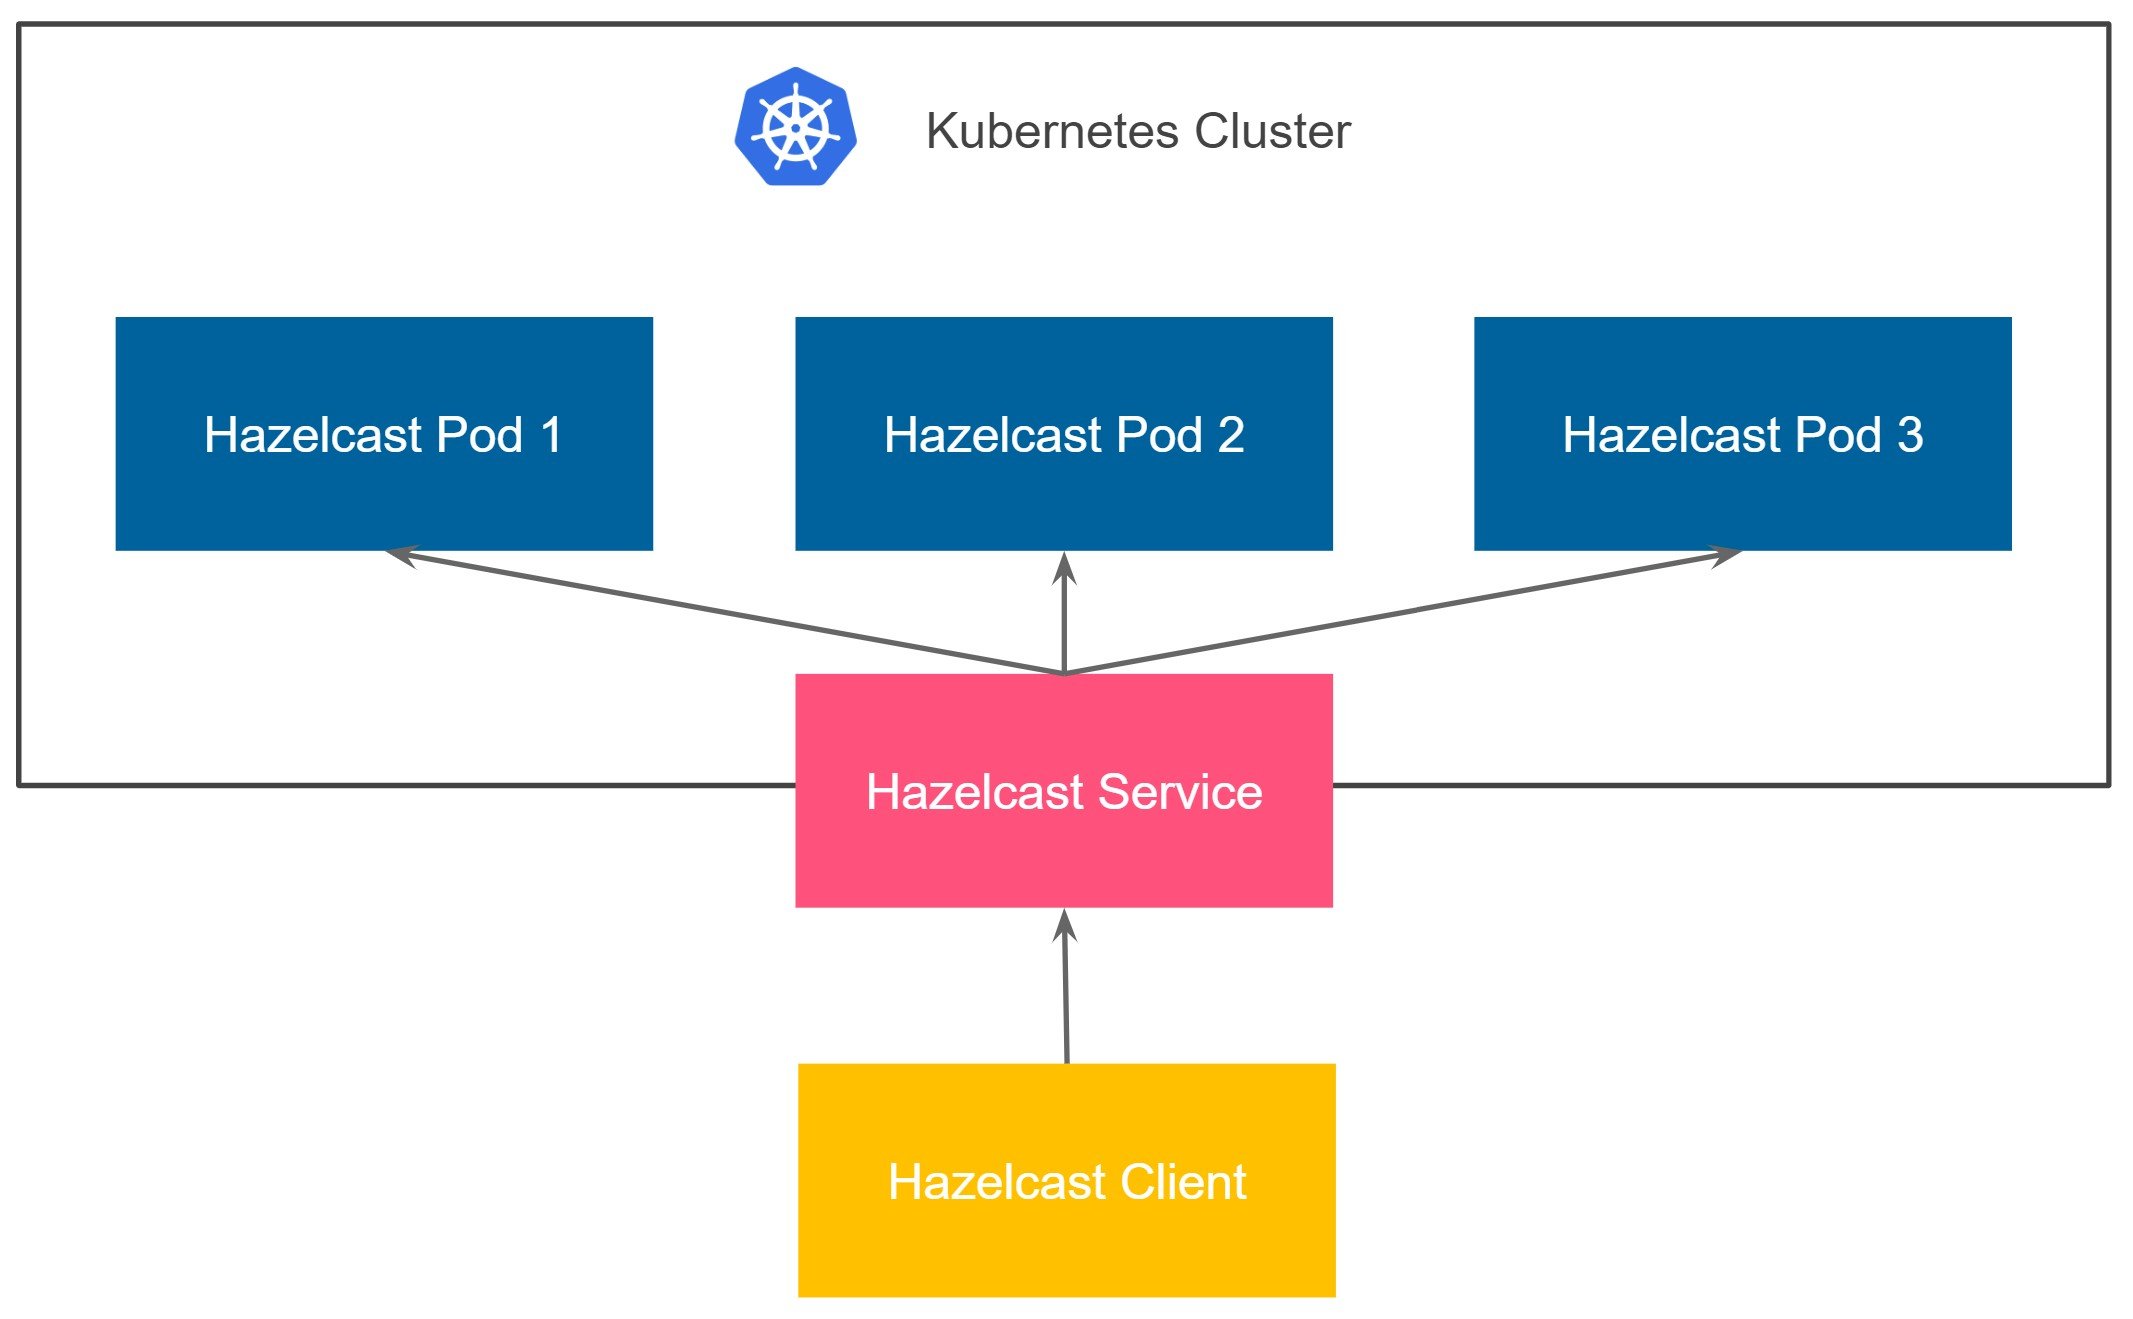
The solution is simple because it fits very well in the Kubernetes world. You can use this method by following three simple steps:
Step 1: Create a Hazelcast cluster with the LoadBalancer service
You can start the Hazelcast cluster with the following command.
helm install hazelcast \
  --set service.type=LoadBalancer,service.clusterIP="" \
  hazelcast/hazelcast
This one command starts the Hazelcast cluster on Kubernetes and exposes it with the LoadBalancer service. Note, if you don’t have an external Load Balancer configured for your Kubernetes cluster (e.g., running Minikube or Docker Desktop locally), you can use NodePort as the service type.
Step 2: Check public IP
Now we need to check the IP of the LoadBalancer service (or the IP of the Kubernetes node and the port of the NodePort service).
$ kubectl get service hazelcast
NAME      TYPE         CLUSTER-IP    EXTERNAL-IP  PORT(S)        AGE
hazelcast LoadBalancer 10.208.12.138 34.70.99.143 5701:32068/TCP 84s
Our public IP address is 34.70.99.143. That’s all we had to do on the Kubernetes part. We already have an on-premises Hazelcast cluster running on Kubernetes and know how to access it!
Step 3: Configure Hazelcast client
It’s time to configure the Hazelcast client. As mentioned earlier, the client application can be run anywhere because it’ll use the public IP to connect to the server. We can update the hazelcast-client.yaml file with the following content.
hazelcast-client:
  network:
    cluster-members:
      - 34.70.99.143
    smart-routing: false
Alternatively, you can configure the Hazelcast client using XML or inline the configuration into your source code.
When you start the application, you should see that it connected successfully to your Hazelcast cluster.
...

Members [3] {
    Member [10.16.2.6]:5701 - 0af4bcce-af77-4b0a-a225-7dc02eebd06b
    Member [10.16.0.3]:5701 - 3f3951e0-1e56-4113-beba-f3fd25fbdd59
    Member [10.16.2.8]:5701 - a466b040-681a-4b52-bdaa-0ebd3e3e458d
}

...
Smart Client
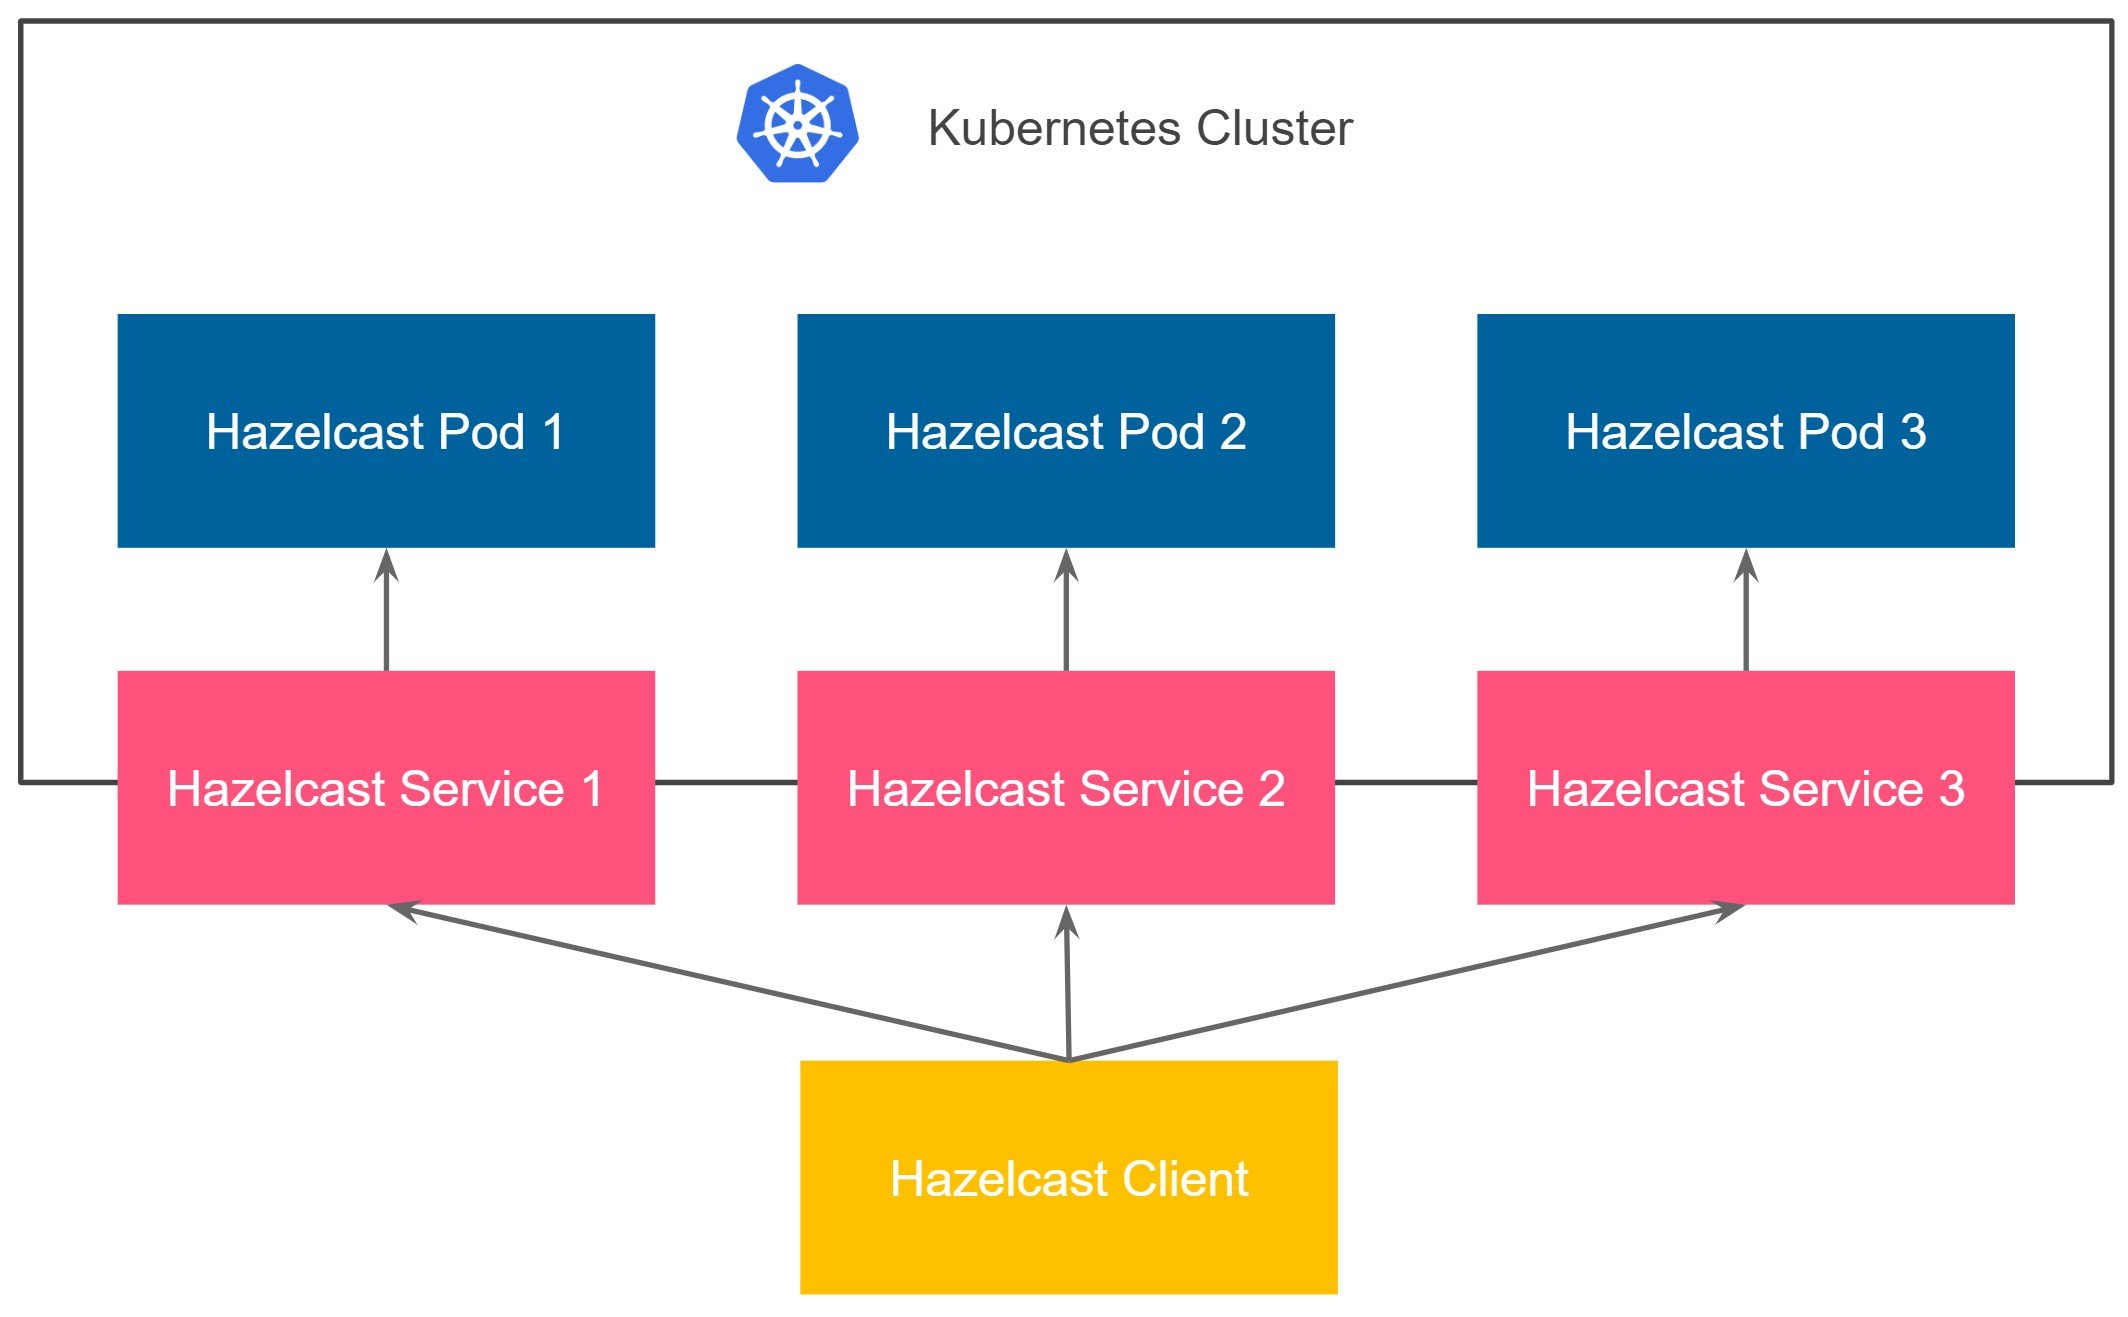
Unisocket is very simple to configure; however, it has one significant drawback—low performance. Using a load balancer is perfect for traffic distribution across stateless services; however, Hazelcast is not stateless. Actually, Hazelcast is more like a sharded database in which each member contains a different part of the data. That is why it’s suboptimal to randomly load balance the traffic. It effectively means that each operation needs to be internally migrated, because your data may be load balanced to member 1, while the partition for its key is stored in member 2. All in all, if performance is important for your use case, then you need to use smart client.
Hazelcast smart client stores the mapping from key to member, which means that it sends the data directly to the member which contains the right data partition. This fact implies that in the Kubernetes environment, we need to provide access to each Hazelcast pod from the outside. There are multiple methods to achieve this. One way would be to use hostPort and then access pods by their Kubernetes nodes. A more dynamic approach is to expose each pod with a separate service. Again, the service can be either LoadBalancer or NodePort. In a real-life scenario, that would probably be NodePort, since having a separate public IP for each pod is expensive.
Kubernetes does not offer a feature for automatically creating a service for each pod. You could write your custom code, but it is even better to reuse the project called Metacontroller, which enables such functionality. Then you can use the Hazelcast Kubernetes plugin to dynamically discover public addresses of Hazelcast pods. Let’s see how it works in practice and follow a few simple steps.
Step 0: Download code sample
You can find a complete description and the source code of how to set up a Hazelcast external smart client in the related code sample. If you want to follow it, clone the repository and open the external-client directory.
git clone https://github.com/hazelcast/hazelcast-code-samples.git
cd hazelcast-code-samples/hazelcast-integration/kubernetes/samples/external-client
Step 1: Set up a Hazelcast cluster with each pod exposed
As the first step, you need to start the Hazelcast cluster in such a way that each member is exposed to a separate public IP/port. The simplest way to achieve that is to use the Metacontroller plugin with the Service-Per-Pod DecoratorController.
1.1. Install Metacontroller plugin
To install the Metacontroller plugin, simply execute the following commands.
# Create metacontroller namespace.
kubectl create namespace metacontroller
# Create metacontroller service account and role/binding.
kubectl apply -f https://raw.githubusercontent.com/GoogleCloudPlatform/metacontroller/master/manifests/metacontroller-rbac.yaml
# Create CRDs for Metacontroller APIs, and the Metacontroller StatefulSet.
kubectl apply -f https://raw.githubusercontent.com/GoogleCloudPlatform/metacontroller/master/manifests/metacontroller.yaml
If you have any issues while creating Metacontroller, it may mean that you don’t have ClusterRole access to your cluster. Please check this for details.
1.2. Install Service-Per-Pod DecoratorController
To install the Service-Per-Pod DecoratorController, you need to execute the following commands.
kubectl create configmap service-per-pod-hooks -n metacontroller --from-file=hooks
kubectl apply -f service-per-pod.yaml
This DecoratorController automatically creates a service for each pod marked with the following annotations:
annotations:
    service-per-pod-label: "statefulset.kubernetes.io/pod-name"
    service-per-pod-ports: "5701:5701"
1.3. Configure Service Account
Hazelcast uses the Kubernetes API for the member discovery, therefore it requires granting permissions to certain resources. To create a Service Account with minimal roles, run the following command.
kubectl apply -f rbac.yaml
The Service Account hazelcast-service-account was created and you can use it in all further steps.
1.4. Install Hazelcast cluster
To install the Hazelcast cluster, you need to include the Service-Per-Pod annotations into your StatefulSet (or Deployment) Hazelcast configuration. Then, deploy the Hazelcast cluster into your Kubernetes environment.
kubectl apply -f hazelcast-cluster.yaml
You can check that there was a service created for each Hazelcast member pod.
$ kubectl get all
NAME              READY     STATUS    RESTARTS   AGE
pod/hazelcast-0   1/1       Running   0          2m
pod/hazelcast-1   1/1       Running   0          1m
pod/hazelcast-2   1/1       Running   0          1m

NAME                  TYPE           CLUSTER-IP      EXTERNAL-IP      PORT(S)          AGE
service/hazelcast-0   LoadBalancer   10.19.241.253   35.188.83.111    5701:30597/TCP   2m
service/hazelcast-1   LoadBalancer   10.19.251.243   35.192.168.46    5701:32718/TCP   2m
service/hazelcast-2   LoadBalancer   10.19.254.0     35.193.248.247   5701:30267/TCP   2m
Note that we could achieve the same by applying some modifications to the Hazelcast Helm chart.
Step 2: Fetch Kubernetes API credentials
Now you have a working Hazelcast cluster deployed on Kubernetes. The next step is to get the credentials to the Kubernetes API, so that we can use them in the Hazelcast Kubernetes Discovery plugin.
2.1. Check Kubernetes Master IP
To check the IP address of the Kubernetes Master, use the following command.
$ kubectl cluster-info
Kubernetes master is running at https://35.226.182.228
2.2. Check Access Token and CA Certificate
First, you need to find the name of the secret for the created Service Account.
$ kubectl get secret
NAME                                 TYPE                                  DATA      AGE
default-token-q9sp8                  kubernetes.io/service-account-token   3         2h
hazelcast-service-account-token-6s94h   kubernetes.io/service-account-token   3         9m
Then, to fetch the Access Token, use the following command.
$ kubectl get secret hazelcast-service-account-token-6s94h -o jsonpath={.data.token} | base64 --decode | xargs echo
eyJhbGciOiJSUzI1NiIsImtpZCI6IiJ9.eyJpc3MiOiJrdWJlcm5ldGVzL3NlcnZpY2VhY2NvdW50Iiwia3ViZXJuZXRlcy5pby9zZXJ2aWNlYWNjb3VudC9uYW1lc3BhY2UiOiJkZWZhdWx0Iiwia3ViZXJuZXRlcy5pby9zZXJ2aWNlYWNjb3VudC9zZWNyZXQubmFtZSI6InNhbXBsZS1zZXJ2aWNlLWFjY291bnQtdG9rZW4tNnM5NGgiLCJrdWJlcm5ldGVzLmlvL3NlcnZpY2VhY2NvdW50L3NlcnZpY2UtYWNjb3VudC5uYW1lIjoic2FtcGxlLXNlcnZpY2UtYWNjb3VudCIsImt1YmVybmV0ZXMuaW8vc2VydmljZWFjY291bnQvc2VydmljZS1hY2NvdW50LnVpZCI6IjI5OTI1NzBmLTI1NDQtMTFlOS1iNjg3LTQyMDEwYTgwMDI4YiIsInN1YiI6InN5c3RlbTpzZXJ2aWNlYWNjb3VudDpkZWZhdWx0OnNhbXBsZS1zZXJ2aWNlLWFjY291bnQifQ.o-j4e-ducrMmQc23xYDnPr6TIyzlAs3pLNAmGLqPe9Vq1mwsxOh3ujcVKR90HAdkfHIF_Sw66qC9hXIDvxfqN_rLXlOKbvTX3gjDrAnyY_93Y3MpmSBj8yR9yHMb4O29a9UIwN5F2_VoCsc0IGumScU_EhPYc9mvEXlwp2bATQOEU-SVAGYPqvVPs9h5wjWZ7WUQa_-RBLMF6KRc9EP2i3c7dPSRVL9ZQ6k6OyUUOVEaPa1tqIxP7vOgx9Tg2C1KmYF5RDrlzrWkhEcjd4BLTiYDKEyaoBff9RqdPYlPwu0YcEH-F7yU8tTDN74KX5jvah3amg_zTiXeNoe5ZFcVdg
To fetch the CA Certificate, use the following command.
$ kubectl get secret hazelcast-service-account-token-6s94h -o jsonpath={.data.ca\\.crt} | base64 --decode
-----BEGIN CERTIFICATE-----
MIIDCzCCAfOgAwIBAgIQVcTHv3jK6g1l7Ph9Xyd9DTANBgkqhkiG9w0BAQsFADAv
MS0wKwYDVQQDEyQ4YjRhNjgwMS04NzJhLTQ2NDEtYjIwOC0zYjEyNDEwYWVkMTcw
HhcNMTkwMTMxMDcyNDMxWhcNMjQwMTMwMDgyNDMxWjAvMS0wKwYDVQQDEyQ4YjRh
NjgwMS04NzJhLTQ2NDEtYjIwOC0zYjEyNDEwYWVkMTcwggEiMA0GCSqGSIb3DQEB
AQUAA4IBDwAwggEKAoIBAQCaty8l9aHeWE1r9yLWKJMa3YQotVclYoEHegB8y6Ke
+zKqa06JKKrz3Qony97VdWR/NMpRYXouSF0owDv9BIoLTC682wlQtNB1c4pTVW7a
AikoNtyNIT8gtA5w0MyjFrbNslUblXvuo0HIeSmJREUmT7BC3VaKgkg64mVdf0DJ
NyrcL+qyCs1m03mi12hgzI72O3qgEtP91tu/oCUdOh39u13TB0fj5tgWURMFgkxo
T0xiNfPueV3pe8uYxBntzFn/74ibiizLRP6d/hsuRdS7IA+bvRLKG/paYwyZuMFb
BDA+kXXAIkOvCpIQCkAKMpyyDz9lBVCtl3eRSAJQLBefAgMBAAGjIzAhMA4GA1Ud
DwEB/wQEAwICBDAPBgNVHRMBAf8EBTADAQH/MA0GCSqGSIb3DQEBCwUAA4IBAQBP
TBRY1IbkFJuboMKLW9tdpIzW7hf2qsTLOhtlaJbMXrWaXCTrl8qUgBUZ1sWAW9Uk
qETwRoCMl1Ht7PhbnXEGDNt3Sw3Y3feR4PsffhcgWH0BK8pZVY0Q1zbZ6dVNbU82
EUrrcnV0uiB/JFsJ3rg8qJurutro3uIzAhb9ixYRqYnXUR4q0bxahO04iSUHvtYQ
JmWp1GCb/ny9MyeTkwh2Q+WIQBHsX4LfrKjPwJd6qZME7BmwryYBTkGa0FinmhRg
SdSPEQKmuXmghPU5GLudiI2ooOaqOXIjVPfM/cw4uU9FCGM49qufccOOt6utk0SM
DwupAKLLiaYs47a8JgUa
-----END CERTIFICATE-----
Step 3: Configure Hazelcast smart client
Now that you have all of the details, you can put them into the Hazelcast client configuration.
3.1. Configure Hazelcast client
Create your Hazelcast client configuration. If you follow the downloaded sample, you can simply modify src/main/resources/hazelcast-client.xml to include your credentials.
<?xml version="1.0" encoding="UTF-8"?>
<hazelcast-client xmlns:xsi="http://www.w3.org/2001/XMLSchema-instance"
                  xsi:schemaLocation="http://www.hazelcast.com/schema/client-config
                               http://www.hazelcast.com/schema/client-config/hazelcast-client-config.xsd"
                  xmlns="http://www.hazelcast.com/schema/client-config">
    <network>
        <kubernetes enabled="true">
            <use-public-ip>true</use-public-ip>
            <kubernetes-master>https://35.226.182.228</kubernetes-master>
            <api-token>eyJhbGciOiJSUzI1NiIsImtpZCI6IiJ9.eyJpc3MiOiJrdWJlcm5ldGVzL3NlcnZpY2VhY2NvdW50Iiwia3ViZXJuZXRlcy5pby9zZXJ2aWNlYWNjb3VudC9uYW1lc3BhY2UiOiJkZWZhdWx0Iiwia3ViZXJuZXRlcy5pby9zZXJ2aWNlYWNjb3VudC9zZWNyZXQubmFtZSI6InNhbXBsZS1zZXJ2aWNlLWFjY291bnQtdG9rZW4tNnM5NGgiLCJrdWJlcm5ldGVzLmlvL3NlcnZpY2VhY2NvdW50L3NlcnZpY2UtYWNjb3VudC5uYW1lIjoic2FtcGxlLXNlcnZpY2UtYWNjb3VudCIsImt1YmVybmV0ZXMuaW8vc2VydmljZWFjY291bnQvc2VydmljZS1hY2NvdW50LnVpZCI6IjI5OTI1NzBmLTI1NDQtMTFlOS1iNjg3LTQyMDEwYTgwMDI4YiIsInN1YiI6InN5c3RlbTpzZXJ2aWNlYWNjb3VudDpkZWZhdWx0OnNhbXBsZS1zZXJ2aWNlLWFjY291bnQifQ.o-j4e-ducrMmQc23xYDnPr6TIyzlAs3pLNAmGLqPe9Vq1mwsxOh3ujcVKR90HAdkfHIF_Sw66qC9hXIDvxfqN_rLXlOKbvTX3gjDrAnyY_93Y3MpmSBj8yR9yHMb4O29a9UIwN5F2_VoCsc0IGumScU_EhPYc9mvEXlwp2bATQOEU-SVAGYPqvVPs9h5wjWZ7WUQa_-RBLMF6KRc9EP2i3c7dPSRVL9ZQ6k6OyUUOVEaPa1tqIxP7vOgx9Tg2C1KmYF5RDrlzrWkhEcjd4BLTiYDKEyaoBff9RqdPYlPwu0YcEH-F7yU8tTDN74KX5jvah3amg_zTiXeNoe5ZFcVdg</api-token>
            <ca-certificate>
                -----BEGIN CERTIFICATE-----
                MIIDCzCCAfOgAwIBAgIQVcTHv3jK6g1l7Ph9Xyd9DTANBgkqhkiG9w0BAQsFADAv
                MS0wKwYDVQQDEyQ4YjRhNjgwMS04NzJhLTQ2NDEtYjIwOC0zYjEyNDEwYWVkMTcw
                HhcNMTkwMTMxMDcyNDMxWhcNMjQwMTMwMDgyNDMxWjAvMS0wKwYDVQQDEyQ4YjRh
                NjgwMS04NzJhLTQ2NDEtYjIwOC0zYjEyNDEwYWVkMTcwggEiMA0GCSqGSIb3DQEB
                AQUAA4IBDwAwggEKAoIBAQCaty8l9aHeWE1r9yLWKJMa3YQotVclYoEHegB8y6Ke
                +zKqa06JKKrz3Qony97VdWR/NMpRYXouSF0owDv9BIoLTC682wlQtNB1c4pTVW7a
                AikoNtyNIT8gtA5w0MyjFrbNslUblXvuo0HIeSmJREUmT7BC3VaKgkg64mVdf0DJ
                NyrcL+qyCs1m03mi12hgzI72O3qgEtP91tu/oCUdOh39u13TB0fj5tgWURMFgkxo
                T0xiNfPueV3pe8uYxBntzFn/74ibiizLRP6d/hsuRdS7IA+bvRLKG/paYwyZuMFb
                BDA+kXXAIkOvCpIQCkAKMpyyDz9lBVCtl3eRSAJQLBefAgMBAAGjIzAhMA4GA1Ud
                DwEB/wQEAwICBDAPBgNVHRMBAf8EBTADAQH/MA0GCSqGSIb3DQEBCwUAA4IBAQBP
                TBRY1IbkFJuboMKLW9tdpIzW7hf2qsTLOhtlaJbMXrWaXCTrl8qUgBUZ1sWAW9Uk
                qETwRoCMl1Ht7PhbnXEGDNt3Sw3Y3feR4PsffhcgWH0BK8pZVY0Q1zbZ6dVNbU82
                EUrrcnV0uiB/JFsJ3rg8qJurutro3uIzAhb9ixYRqYnXUR4q0bxahO04iSUHvtYQ
                JmWp1GCb/ny9MyeTkwh2Q+WIQBHsX4LfrKjPwJd6qZME7BmwryYBTkGa0FinmhRg
                SdSPEQKmuXmghPU5GLudiI2ooOaqOXIjVPfM/cw4uU9FCGM49qufccOOt6utk0SM
                DwupAKLLiaYs47a8JgUa
                -----END CERTIFICATE-----
            </ca-certificate>
        </kubernetes>
    </network>
</hazelcast-client>
3.2. Run Hazelcast client application
When running the application, you should see that the Hazelcast cluster is automatically discovered. If you follow the downloaded code sample, you can run the client application with the following command.
mvn spring-boot:run
The sample application is a web service that uses the Hazelcast client to connect to the Hazelcast cluster.
To check that it works correctly, you can:
- Open browser at:
http://localhost:8080/put?key=sampleKey&value=sampleValue(you should see a reply{"response":null}) - Open browser at:
http://localhost:8080/get?key=sampleKey(you should see a reply{"response":"sampleValue"}) - Check the application logs to find that the client successfully connected to the Hazelcast cluster, which contained three members.
Conclusion
Hazelcast allows you to set up your own on-premises Hazelcast cluster running on Kubernetes. To connect to it, you can either choose the simpler unisocket client or the more performant smart client. We plan to make some improvements to the former solution. You can expect that you’ll not need to use Kubernetes API (and the related credentials exchange) for the client discovery. We also plan to add support for the hostPort configuration, which will allow you to skip the Metacontroller setup. We’ll keep you posted. Because, as I wrote at the beginning, Hazelcast loves Kubernetes!