
By Rafal Leszko
Cloud Software Engineer
Rafał is a passionate software engineer, trainer, conference speaker, and author of the book, Continuous Delivery with Docker and Jenkins. He specializes in Java development, cloud environments, and continuous delivery. Prior to joining Hazelcast, Rafał worked with a variety of companies and scientific organizations, including Google, CERN, and AGH University of Science and Technology.
View all blogs by the authorMay 30, 2019
Hazelcast Sidecar Container Pattern
The sidecar pattern is a technique of attaching an additional container to the main parent container so that both would share the same lifecycle and the same resources. You may think of it as a perfect tool for decomposing your application into reusable modules, in which each part is written in a different technology or programming language. For example, imagine you have an application with some business logic and you want to add monitoring. This monitoring part can be a separate component, very generic, and packaged as a Docker image. Then, you can deploy both images together, and the monitoring container plays the role of a sidecar providing additional functionality to the main application.
Kubernetes allows running multiple containers in one Pod, which effectively means sharing resources (host, network, filesystem, etc.) by those containers. You might have heard about it because of the Istio service mesh, which has recently become very popular and uses the sidecar pattern to run a proxy container (that steers the traffic coming from/to the main application container).
Hazelcast is a perfect fit to be run as a sidecar because it’s a very generic tool that provides additional functionality to the business logic. Let’s see how we can use Hazelcast sidecar topology as opposed to the classic Hazelcast topologies and implement it all in the Kubernetes environment.
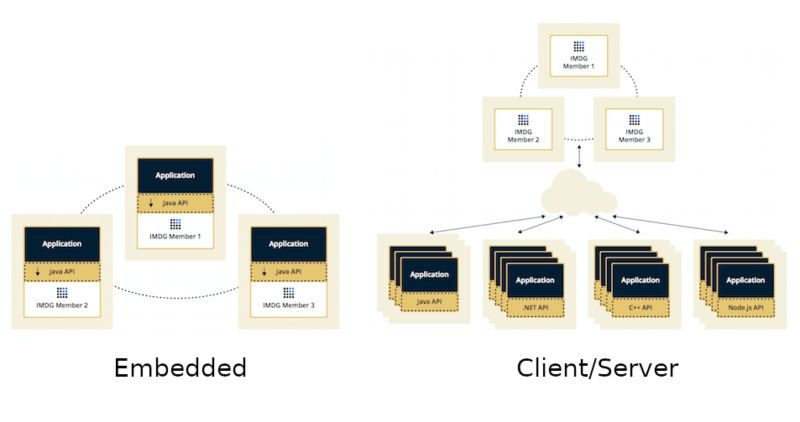
Hazelcast Classic Topologies
Hazelcast is usually deployed using one of two topologies:
- Embedded
- Client/Server
The Embedded topology is dedicated to JVM-based applications. The application itself starts a Hazelcast member, which is simple to configure. Such an approach also provides low-latency data access, because Hazelcast member runs on the same machine as the application. Furthermore, Hazelcast scales together with your application. You can find an example of the embedded Hazelcast deployed on Kubernetes here.
The Client/Server topology, on the other hand, can be used by any programming language for which a Hazelcast Client is available (Java, .NET, C++, Node.js, Python, Go, Scala). It also separates Hazelcast data from the running applications and lets them scale separately. You can find an example of the client/server Hazelcast deployed on Kubernetes here.
These two topologies may sound like all we need; however there are some critical use cases which they don’t cover. Let’s first explain the Sidecar topology and then look at when and how to use it.
Hazelcast Sidecar Topology
With the use of the sidecar pattern, we can introduce the Sidecar topology, which would place somewhere between Embedded and Client/Server.
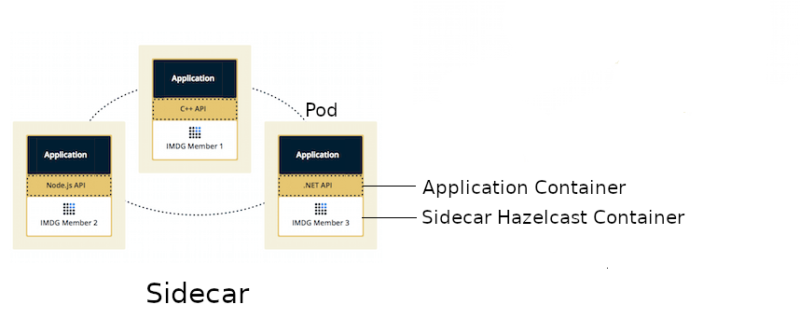
Sidecar topology brings the benefits of the Embedded topology because Hazelcast scales together with the application and both containers run on the same machine. However, the application can be written in any programming language, because it connects to Hazelcast member using the standard Hazelcast Client libraries. What’s more, Kubernetes Hazelcast auto-discovery is currently implemented only for Java and the Hazelcast sidecar container makes auto-discovery available for all programming languages!
To stress it even more, deploying Hazelcast as a sidecar can help in many use cases:
- Emulating Embedded mode for non-JVM languages (low latency, auto-scaling)
- Kubernetes Hazelcast auto-discovery for non-JVM languages
- Consistent configuration between Sidecar and Client/Server topologies (switching from one to another means just a small Hazelcast configuration update)
- Clear isolation between Hazelcast and the application, but still having the benefits of the Embedded topology
Let’s see some code and explain how to deploy Hazelcast as a sidecar in the Kubernetes environment.
Hazelcast Sidecar Implementation
We’ll implement a simple Python-based web service which uses Hazelcast deployed as a sidecar container. The web service will have two endpoints:
/putfor putting a value into a Hazelcast distributed map/getfor getting a value from a Hazelcast distributed map
The source code for this example is available here. Assuming you have a running Kubernetes cluster and the kubectl command configured, you can implement the following steps:
- Create a Python application
- Dockerize Python application
- Create Kubernetes deployment
- Deploy application together with Hazelcast
- Verify everything works correctly
Let’s proceed step-by-step.
Step 1: Create a Python application
You can find the Python web service application (written with the Flask framework) in the app.py file. The most interesting part is the connection to the Hazelcast member.
config = hazelcast.ClientConfig()
config.network_config.addresses.append("127.0.0.1:5701")
hazelcastClient = hazelcast.HazelcastClient(config)
We connect to 127.0.0.1, because in the Kubernetes Pod all containers share the same network layer. Thanks to that, we can always depend on the fact that the Hazelcast member is running at localhost.
Then, in the endpoint controller, we use hazelcastClient as we always do.
map = hazelcastClient.get_map("map")
value = map.get(key)
Step 2: Dockerize Python application
In the provided Dockerfile, we install Flask and hazelcast-client-python Python packages. Then, we start the application on the default Flask port (5000).
You can build a Docker image for the application and push it into your Docker Hub (change leszko to your Docker Hub account).
$ docker build -t leszko/hazelcast-python-client .
$ docker push leszko/hazelcast-python-client
Note: If you don’t have a Docker Hub account or you don’t want to build your own Docker image, then use leszko/hazelcast-python-client in all further steps.
Step 3: Create Kubernetes deployment
The next step is to configure the Python application container and Hazelcast member container to exist in the same Kubernetes Pod. We do this in deployment.yaml.
containers:
  - name: hazelcast
    image: hazelcast/hazelcast:3.12
    ports:
    - name: hazelcast
      containerPort: 5701
    ...
  - name: app
    image: leszko/hazelcast-python-client
    ports:
    - name: app
      containerPort: 5000
Apart from that, we configure the deployment to have 2 Pod replicas and a NodePort service to expose the Python application.
Step 4: Deploy application together with Hazelcast
Before running the deployment, we need to configure RBAC (rbac.yaml, needed for Hazelcast container to make calls to Kubernetes API) and store Hazelcast configuration in ConfigMap (config.yaml). This step enables Hazelcast Kubernetes auto-discovery, and Hazelcast members can form one Hazelcast cluster.
$ kubectl apply -f rbac.yaml
$ kubectl apply -f config.yaml
Finally, we can deploy our application with the sidecar Hazelcast member.
$ kubectl apply -f deployment.yaml
Step 5: Verify everything works correctly
You should see 2 Pods, each having 2 containers (hazelcast and app).
$ kubectl get pods
NAME                  READY   STATUS    RESTARTS   AGE
hazelcast-sidecar-0   2/2     Running   2          1m
hazelcast-sidecar-1   2/2     Running   2          1m
We can check that Hazelcast members formed a cluster.
$ kubectl logs hazelcast-sidecar-0 hazelcast
...
Members {size:2, ver:2} [
        Member [10.16.2.9]:5701 - 429dc103-310e-44f1-a0e4-7a7b958cfde6
        Member [10.16.1.10]:5701 - 099ecbb8-0f75-4b94-84c3-4ef235e4f365 this
]
You can also check that the Python application connected correctly to the Hazelcast cluster.
$ kubectl logs hazelcast-sidecar-0 app
...
Members [2] {
        Member [10.16.1.10]:5701 - 099ecbb8-0f75-4b94-84c3-4ef235e4f365
        Member [10.16.2.9]:5701 - 429dc103-310e-44f1-a0e4-7a7b958cfde6
}
...
 * Running on http://0.0.0.0:5000/ (Press CTRL+C to quit)
Finally, we can check the NodePort Service IP and Port and insert some data using /put and /get endpoints.
To check <NODE-PORT>, run the following command.
$ kubectl get service hazelcast-sidecar
NAME                TYPE       CLUSTER-IP     EXTERNAL-IP  PORT(S)         AGE
hazelcast-sidecar   NodePort   10.19.247.87   <none>       5000:32470/TCP  4m
In our case <NODE-PORT> is 32470.
Checking <NODE-IP> depends on your Kubernetes:
- In the case of Docker Desktop, it’s
localhost - In the case of Minikube, check it with
minikube ip - In case of Cloud platforms (and on-premises), check it with:
kubectl get nodes -o jsonpath='{ $.items[*].status.addresses[?(@.type=="ExternalIP")].address }'
Let’s insert some data and then read it.
$ curl <NODE-IP>:<NODE-PORT>/put?key=someKey\&value=someValue
$ curl <NODE-IP>:<NODE-PORT>/get?key=someKey
someValue
That’s it! We have just deployed a Hazelcast cluster in which all members are run as sidecars (deployed together with their parent application containers). Note the beauty of this solution. If you scale the application, then it scales together with Hazelcast, however, still it can be written in a different language than JVM-based and preserves the container isolation.
Conclusion
We have just seen how to use Hazelcast as a sidecar container. It was a straightforward (but useful!) scenario. We could think of many more examples of how to use Hazelcast as a sidecar. For instance, with some effort, we could implement a traffic interceptor (similar to what Istio does) which would add the HTTP caching without the main application even knowing about it. The sidecar container could then proxy the traffic to the main application, but if the same HTTP request is received multiple times, it will return the cached value instead. Such a use case is very similar to Varnish HTTP Cache does, so Hazelcast could even improve it!