
By Mike Yawn
Senior Solutions Architect, Hazelcast
Mike Yawn is a Senior Solutions Architect with Hazelcast, the provider of the leading operational In-Memory Computing Platform. In that role, he provides pre-sales consulting on the Hazelcast Platform and Hazelcast Cloud solutions to commercial customers. Prior to joining Hazelcast, Mike performed a number of consulting and R&D functions with HP, eBay, Oracle, and EMC, supporting customers in manufacturing, banking, healthcare, and other industries.
View all blogs by the authorAug 19, 2020
Getting Started with Hazelcast Cloud Enterprise on Microsoft Azure
Note: An AWS-specific version of this blog post was previously posted here; in this version we’ve updated the content to cover deployments on Microsoft Azure as well as new features.
12/17/2020 – This blog was updated to reflect the current availability of Hazelcast Cloud Enterprise on major cloud offerings.
Hazelcast Cloud Enterprise is the new cloud-native managed service that allows you to quickly set up a cluster of Hazelcast IMDG nodes in a public cloud, and have that cluster fully managed for you by Hazelcast.
Setting up the cluster requires just a few steps, and we will take you through everything you need to do to get your first cloud-based cluster up and running. For this blog, we’ll deploy our Hazelcast Cloud Enterprise cluster on Azure and use the new public access feature to allow our client to connect from outside the cloud (on a developer’s laptop, for example).
Creating the Hazelcast Cluster
For the current release of Hazelcast Cloud Enterprise, account set-up is being performed via our Sales team. Future releases will include a self-service, pay-as-you-go option. To initiate the process, visit https://hazelcast.com/products/cloud and enter your email address. Our sales staff will then contact you to help determine your requirements and set you up with a Hazelcast Cloud Enterprise account.
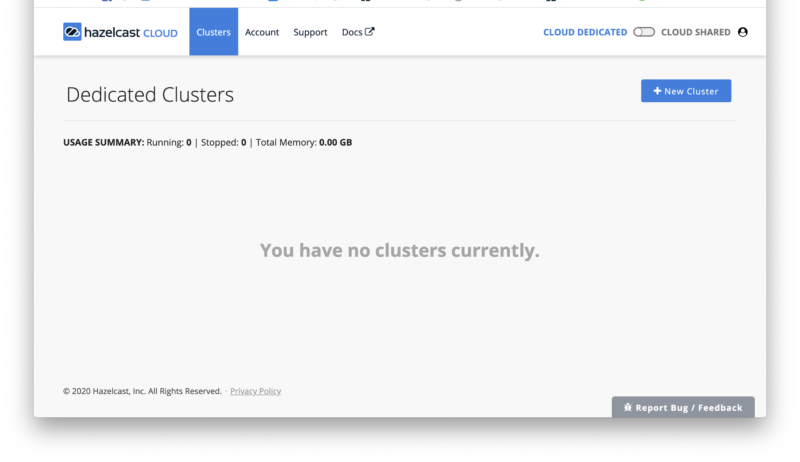
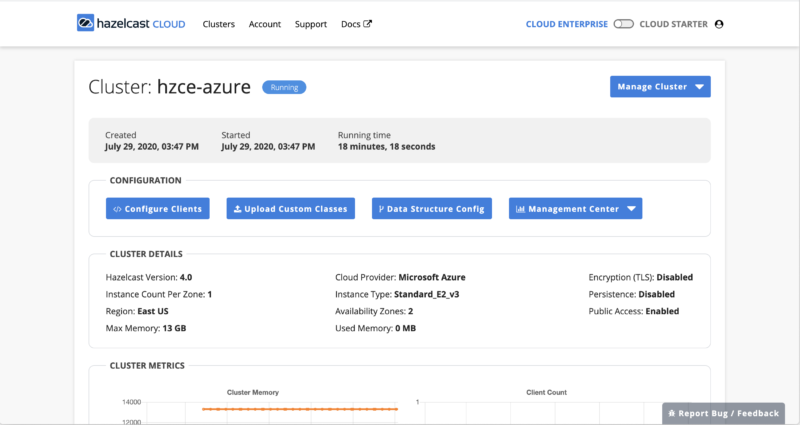
Once your account has been created, you’ll be sent an email that includes a link to activate your account. This link will connect you to the cloud console at https://cloud.hazelcast.com/. The first time you visit, you’ll be prompted to set up your account password. Once you’ve done this, you will see the cluster management screen, which gives you the option to create a new cluster as shown below.
From here, you click on the “New Cluster” button in the upper right corner to create a new cluster. This will bring up the New Cluster dialog (you’ll need to scroll to see the entire screen, shown in the two screenshots below).
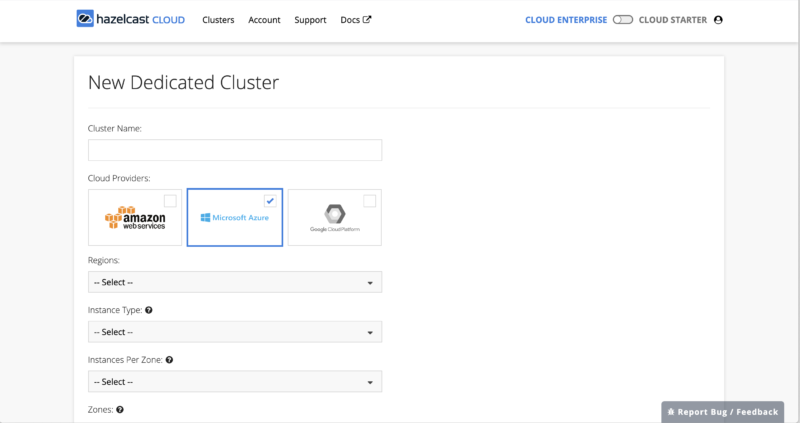
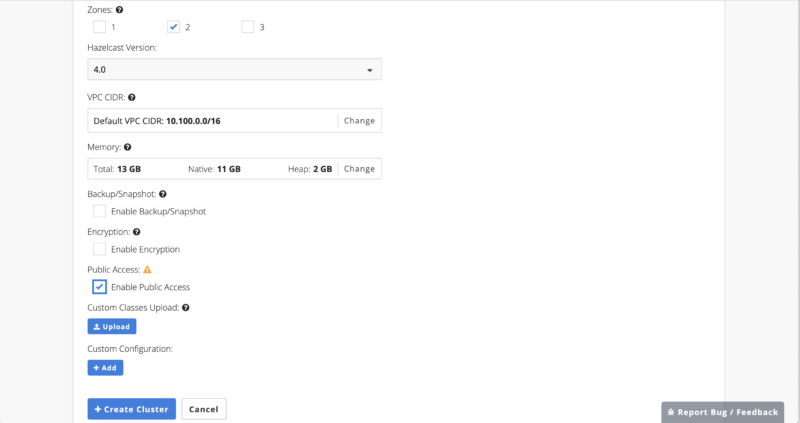
Figure 3: New Cluster screen (bottom)To create a new cluster, you can fill in the values as appropriate. Here are some suggestions:
- Cluster name: I used HZCE-Azure
- Cloud Provider: Azure (AWS is also available now, with Google Cloud coming later this year)
- Regions: Select the region that makes sense for you, I used East US
- Instance Type: For a simple initial test, anything will do; I picked Standard_E2_v3 (13 GB memory, 2 CPU cores).
- Instances per zone: 1 is sufficient for this test, but one of the strengths of Hazelcast is that it will automatically create backups when there are multiple instances in the cluster, so when moving our app from development and testing to production, we’d want to increase this value.
- Zones: The zones available will vary depending on the region selected. For a production deployment, I’d likely want to select multiple availability zones for fault tolerance, but for this simple exercise I just selected a single zone, zone 2.
- Hazelcast version: I selected 4.0, the most recent version at the time this was written.
- VPC CIDR: This setting controls how IP addresses will be allocated for your cluster; the default is appropriate for most situations so I left it as defaulted.
- Memory: Will vary based on the Instance Type selected; because I selected an instance type with 13GB here, my total memory cannot exceed that. I kept the default setting of 11GB native memory, 2GB heap memory. (Native or HD memory helps avoid the GC overhead of the JVM, but even with all data stored off-heap the JVM will require some memory to operate, so this is a reasonable default allocation).
- Enable persistence: No (left unchecked); no real production data will be sent into the cluster.
- Enable encryption: No (left unchecked); if selected data in transit to and from the cluster will be encrypted using SSL.
- Enable public access: Yes (checked). For best performance, the clients should be deployed to the same region and availability zone as the cluster, and connected via a secure vNet Peering connection. But during development and testing it is easier to connect from outside the cloud environment.
- I did not add any custom configuration
With all fields filled in, you can click “Create Cluster” to create the cluster.
This process will take some time (perhaps 20-30 minutes) as the requested number of nodes needs to be provisioned, configured, and have the appropriate Hazelcast software installed. While this is happening, your cluster will show in the pending state, as seen below:
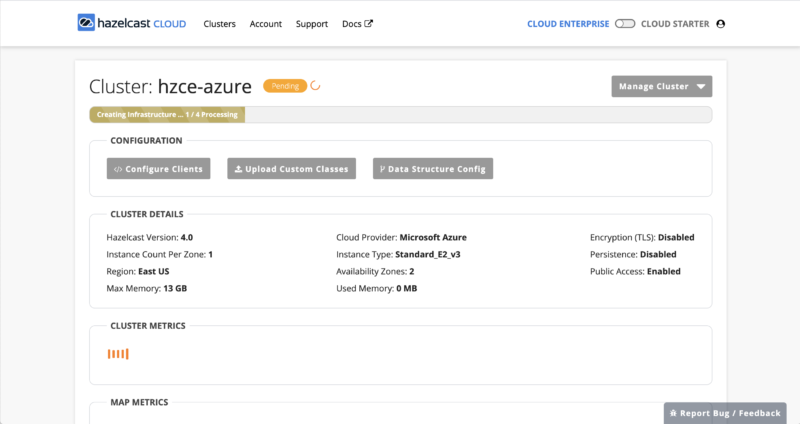
Once the cluster state changes from ‘pending’ to ‘running’, your cluster is ready to use and now your focus shifts from getting the cluster running (which is now complete) to getting clients running and able to access the cluster. There are multiple ways to accomplish this depending on your cloud provider, security requirements, and client language. For simplicity, we’ve enabled public access and disabled encryption, which will get us up and running quickly.
Configuring the Client
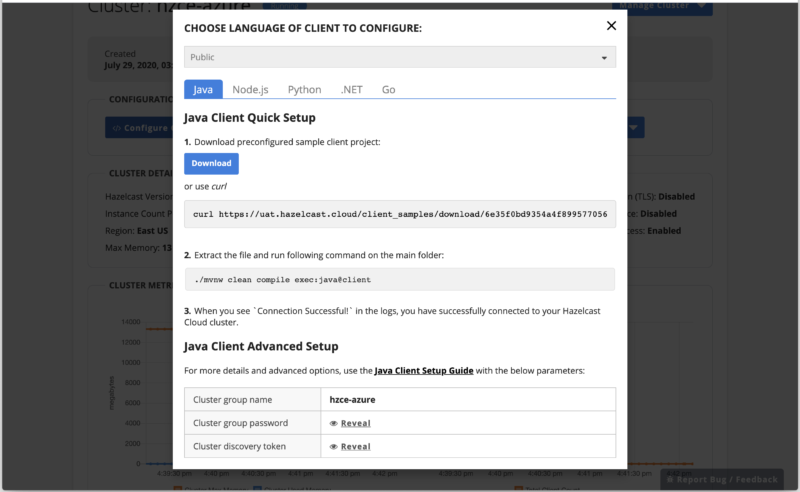
Our next step is to configure one or more clients to connect to the cluster. To do this, click the left-hand ‘Configure Clients’ button.
This will bring up the dialog below. The dialog presents a number of options so that the client code you generate will connect to your cluster without the need for any additional configuration on your part. There are several variations in how the code will be generated, depending on selections you make here as well as options you chose when creating the cluster.
- At the top of the dialog is a drop-down list (showing Public in the screenshot below). If you selected the Public Access option when creating the cluster, you’ll be able to select Public here. If you have created a vNet peering for your cluster, you will be able to select vNet Peering here. Choose the appropriate option for whether you want to generate public access or secure access client. (If you did not select Public Access and have yet to create a vNet Peering connection, there will be a warning banner indicating you need to create the vNet Peering before your client will connect).
- Next, choose the language you want the generated client code to be in.
- If you selected Enable Encryption when creating the cluster, the created client will include code to load the required keypair info from the keystore.
Once you’ve configured the client, you can download the code to your local system using the download button. If the code is going to be deployed somewhere else, you might find it easier to use curl to pull the client code over to the deployment system – the command to do this is shown on the dialog so you can easily copy it to your clipboard and then paste it into the appropriate terminal window for execution.
You can repeat the client generation process as many times as you like if you want to have clients with different settings (different languages or public vs. secure access).
Installing, Building, and Running the Client Code
Once you have the client code installed on the system where it needs to run (using either the download button or the curl command as shown in the last section), you should unzip the client zip file in the location of your choice.
Here we will assume that you’re using Public access, and running the client from your local development system which already has Java installed. (If not, you’ll need to install a JDK — just the JRE is insufficient; version Java 8 or later).
To build the client, enter the following command (the zip file included Maven so mvnw should be present in the current working directory)
./mvnw clean compile exec:java@client
If you selected the option to enable encryption when creating the cluster, the command becomes
./mvnw clean compile exec:java@client-with-ssl
This command compiles the client and then immediately begins executing it; you will see output logged indicating the number of items that have been added to the map in the cluster. The client will run until terminated (by control-C).
If you go back to the Hazelcast Cloud console, you can observe the map filling. Select the ‘Management Center’ button on the right side and in the drop-down check the box to enable management center access. Once Management Center has been enabled, you can open the management center window by selecting the same Management Center button again, which will have an Open Management Center action. Once selected, Management Center will launch in a separate browser tab. You can monitor the increasing memory usage since our client adds entries to the map. Note that Hazelcast Cloud stores map entries in off-heap storage, so heap memory will fluctuate but native memory will be increasing steadily.
Next steps
You’ll want to create a client program that does useful business functions, rather than just fill a map with dummy data. If you look at the generated Client program, you’ll see that it has all the logic needed to configure access to the cluster. You can copy the portion of the program that establishes the connection and use this as the basis for your new client code.