
By Mike Yawn
Senior Solutions Architect, Hazelcast
Mike Yawn is a Senior Solutions Architect with Hazelcast, the provider of the leading operational In-Memory Computing Platform. In that role, he provides pre-sales consulting on the Hazelcast Platform and Hazelcast Cloud solutions to commercial customers. Prior to joining Hazelcast, Mike performed a number of consulting and R&D functions with HP, eBay, Oracle, and EMC, supporting customers in manufacturing, banking, healthcare, and other industries.
View all blogs by the authorMar 31, 2020
Getting Started with Hazelcast Cloud Enterprise
12/17/2020 – This blog was updated to reflect the current availability of Hazelcast Cloud Enterprise on major cloud offerings.
Hazelcast Cloud Enterprise is the new cloud-native managed service that allows you to quickly set up a cluster of Hazelcast IMDG nodes in a public cloud, and have that cluster fully managed for you by Hazelcast.
Setting up the cluster requires just a few steps, and we will take you through everything you need to do to get your first cloud-based cluster up and running. For this blog, we’ll deploy our Hazelcast Cloud Enterprise cluster on Amazon AWS, and we will deploy the client code to access the cluster on an Amazon EC2 instance.
Creating the Hazelcast Cluster
For the first generally available release of Hazelcast Cloud Enterprise, account set-up is being performed via our Sales team. Future releases will include a self-service, pay-as-you-go option. To initiate the process, visit https://hazelcast.com/products/cloud and enter your email address. Our sales staff will then contact you to help determine your requirements and set you up with a Hazelcast Cloud Enterprise account.
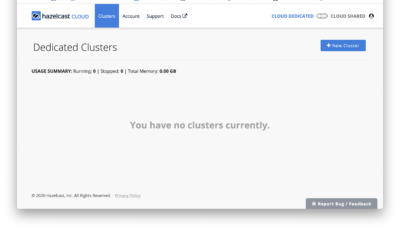
Once your account has been created, you’ll be sent an email that includes a link to activate your account. This link will connect you to the cloud console at https://cloud.hazelcast.com/. The first time you visit, you’ll be prompted to set up your account password. Once you’ve done this, you will see the cluster management screen, which gives you the option to create a new cluster as shown below.
From here, you click on the “New Cluster” button in the upper right corner to create a new cluster. This will bring up the New Cluster dialog (you’ll need to scroll to see the entire screen, shown in the two screenshots below)
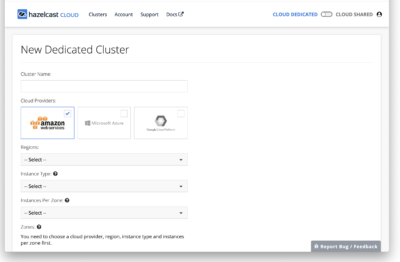
To create a new cluster, you can fill in the values as appropriate. Here are some suggestions:
- Cluster name: I used HCE-1701
- Cloud Provider: Amazon AWS (Azure and GCP are also available)
- Regions: Select the region that makes sense for you, I used US East (N Virginia)
- Instance Type: For a simple initial test, anything will do; I picked m5.large (7 GB memory, 2 CPU cores).
- Instances per zone: 1 is sufficient for this test. But one of the strengths of Hazelcast is that it will automatically create backups when there are multiple instances in the cluster, so when moving our app from development and testing to production, we’d want to increase this value.
- Zones: The zones available will vary depending on the region selected. For a production deployment, I’d likely want to select multiple availability zones for fault tolerance, but for this simple exercise I just selected a single zone, us-east-1a.
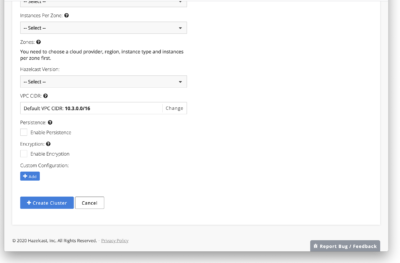
- Hazelcast version: I selected 3.12.5, the most recent version at the time this was written.
- VPC CIDR: This setting controls how IP addresses will be allocated for your cluster; the default is appropriate for most situations so I left it as defaulted.
- Memory: Will vary based on the Instance Type selected; because I selected an instance type with 7GB here, my total memory cannot exceed that. I kept the default setting of 6GB native memory, 1GB heap memory. (Native or HD memory helps avoid the GC overhead of the JVM, but even with all data stored off-heap the JVM will require some memory to operate, so this is a reasonable default allocation).
- Enable persistence: No (left unchecked); no real production data will be sent into the cluster.
- Enable encryption: Yes (checked); will encrypt data to and from the cluster using SSL.
- I did not add any custom configuration
With all fields filled in, you can click “Create Cluster” to create the cluster.
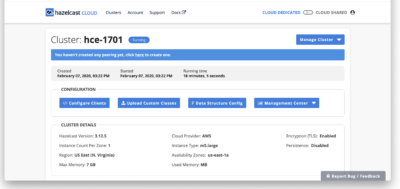
This process will take some time (perhaps 10-15 minutes) as the requested number of nodes needs to be provisioned, configured, and have the appropriate Hazelcast software installed. While this is happening, your cluster will show in the pending state, as seen below:
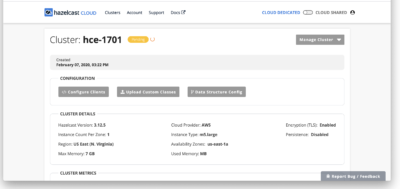
Once the cluster state changes from ‘pending’ to ‘running’, your cluster is ready to use, so now our focus shifts from getting the cluster running (which is now complete) to getting clients running and able to access the cluster. There are multiple ways to accomplish this depending on your cloud provider, security requirements, and client language; but the basic steps are the same in each case:
- Set up a client instance on the same cloud platform where the cluster is deployed
- Create a secure connection between the client instance and the Hazelcast Cloud Enterprise cluster
- Install, build, and run client software on the client instance.
We’ll go through each of these steps in turn.
Setting up a AWS EC2 Client Instance
The process for setting up a client will vary depending on the cloud platform on which you’re deploying. At first release, Hazelcast Cloud Enterprise is launching on AWS; so we’ll cover how to set up an AWS EC2 client instance. There is nothing unique in the client setup; if you already have existing EC2 instances that you want to use as cloud clients, you can skip this setup and go to the section on Creating a Secure Connection.
Creating and Starting an EC2 Instance
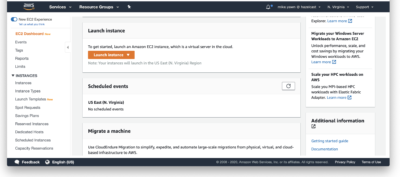
Log into your AWS account, and from the services available select EC2 (or just browse directly to https://console.aws.amazon.com/ec2). On the EC2 dashboard, scroll down until you see the Launch Instance option (shown below) and click on it.
Once you select Launch Instance, you’ll be walked through a series of choices about the instance you will create. The start of the dialog is shown below
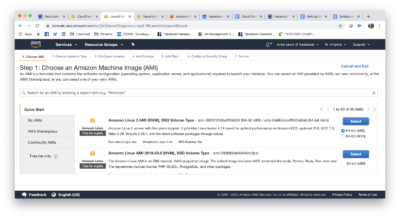
You can pick whatever options you like, but here are some reasonable choices that will work:
- Step 1: Pick AMI
- Chose AMI (Amazon Machine Image): Amazon Linux 2 AMI
- Step 2: Chose an Instance type
- For just a quick test, I went with a t2.micro as an inexpensive option; but for a production deployment we would want to avoid the ‘low’ network performance rating of this instance type.
- Step 3: Configure Instance Details
- Number of Instances: 1 (or more if you want to test multiple clients)
- Purchasing option: Leave unchecked
- Network: Select the option to create a new VPC using the link here.
- Create VPC dialog (this will launch in a new browser tab)
- Name tag: I recommend using a name that associates it with the Hazelcast cluster you will connect to; so in my case I used vpc-hce1701
- IPv4 CIDR block: 10.0.0.0/16
- Leave IPv6 CIDR blank’
- Tenancy: default
- Click create.
- After creating the VPC, you’ll be shown a list of all VPCs belonging to your account. Select the one you just created, and in the ‘Actions’ drop-down menu at the top of the screen, select ‘Edit DNS Hostnames’. In the resulting screen, check the box to enable DNS hostnames and click Save.
- Return to the original ‘Launch instance’ tab. (You can close the Create VPC tab as you won’t need it again).
- Back on the main screen, click the ‘refresh’ arrow next to the network drop-down, so the VPC you just created will be visible when you click the drop-down list. Then select the new VPC.
- Create VPC dialog (this will launch in a new browser tab)
- Subnet: Select the option to create a new subnet using the link to the right of the drop down,.
- Create Subnet dialog:
- As with the VPC, use a name that associates with the cluster name. I used subnet-hce1701.
- VPC: select the VPC you just created above.
- Availability zone: For best performance, select the availability zone used for the Hazelcast cluster.
- VPC CIDRs – as defaulted
- IPv4 CIDR block: 10.0.0.0/16
- Click create.
- After creating the Subnet, you’ll see a list of all subnets belonging to your account. Select the newly created one, and in the actions menu select ‘modify auto-assign IP settings’. In the resulting screen, check the box to enable auto-assign public IPv4 addresses. (This is needed to allow you to SSH into the instance to unzip and build the client code). Save the new setting.
- You are now down with the ‘Create subnet’ function, you can close this tab and return to the main Launch Instance browser tab.
- Create Subnet dialog:
- On the launch screen, there isn’t an option to refresh the subnet list, but if you click the refresh button next to Network (VPC), you can re-select your new VPC and then the new subnet will appear and can be selected.
- Auto-assign Public IP: Enable
- Everything else for this step can be left as defaulted; and the next screens will all be defaulted as well. So you can click ‘Review and Launch’ at the bottom of the screen. (If you prefer, you can click Next and review the next screens having settings for Storage, Tags, and Security Groups
- Click Launch. You’ll be prompted to select a key pair to use for secure connection to the instance. You should have a keypair that was created when you set up your AWS account, select this from the list and then click Launch Instances. (You can also create a new keypair here if you can’t easily locate an existing one).
- You’ll see a Launch Status screen with a hex string identifier of your instance. Click on this, and you can then use the edit icon (pencil) to assign a friendlier name to your instance (I used hce-1701-client)
Now the instance has been launched, but there are a few settings we need to go back and modify that we weren’t given the option of setting during the create and launch process.
Open and new tab and navigate to the VPC console (https://console.aws.amazon.com/vpc/). In the list of configurable items along the left margin, click on ‘Internet Gateways’, and then at the top of the resulting screen click ‘Create Internet Gateway’. Configure the new gateway with a name that you’ll recognize as going along with the other components (gateway-hce1701 in my case), click ‘Create’, and the click ‘Close’. Then, when back at the list of all internet gateways, select the checkbox next to the one just created and select ‘Attach to VPC’ from the actions menu. Select the VPC you created earlier in the dialog, and then click ‘Attach’. That completes creating the Internet Gateway.
Now we’ll need to edit the route table. Still on the VPC console page, choose the Subnets item from the left-hand menu. Select the subnet associated with your VPC, and details related to that subnet will be displayed in the bottom half of the screen. Select the tab labeled ‘Route Table’. You will want a route table with a destination of 10.0.0.0/0 and a target of your internet gateway. (By default, you will probably see the destination 10.0.0.0/16 configured with a target of ‘local’). There will be a clickable link with the hex string designation of your route table (just below the button labeled ‘Edit Route Table association’. Click on the hex string (not the button) to be taken to the screen where you can edit the routes.
On the screen that follows, the route table should be pre-selected, with details at the bottom of the screen. Click the ‘Routes’ tab, and then ‘Edit Routes’ Click ‘Add route’ to add a new route. Fill in a destination of 0.0.0.0/0 and a target of the internet gateway just added. Click Save Routes and then Close. You’re now done with the VPC Dashboard tab.
Back on the EC2 Instances page, we’re now ready to connect to our running instance. Select the instance from the instances list, if it isn’t already selected. Click the ‘Connect’ button (at the top of the screen next to the Launch Instance button). This will show a dialog with various methods to connect to the instance.
Select the ‘Standalone SSH client’ option. Make a note of the suggested command line to connect to the instance. (Copying this to the clipboard is the easiest way to do this).
Open a terminal window and type or paste the connection string from the dialog above.
(If you receive an error – such as operation timed out — you will need to follow the troubleshooting procedure at https://docs.aws.amazon.com/AWSEC2/latest/UserGuide/TroubleshootingInstancesConnecting.html)
Once you’ve successfully logged in, you will continue by configuring secure access between the EC2 instance and the Hazelcast Cloud.
Creating a secure connection between Hazelcast Cloud and your Client code
You cannot log into Hazelcast Cloud members using a shell; all access will be via clients. These clients will communicate over a secure connection. This secure connection mechanism may vary between clouds, or even within a cloud (for example, AWS connections can be made via VPC Peering or AWS PrivateLink). For this post, we’ll only cover the VPC Peering option.
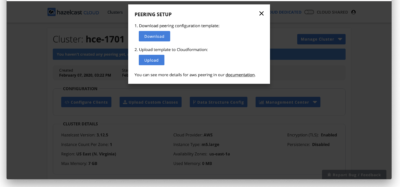
As soon as cluster creation completes, you’ll be prompted to create a secure connection by a banner as shown in the screenshot below. This is done via a VPC Peering template, that will be created for you (there is no need to alter the template, it is fully ready-to-deploy). You simply need to upload the template into your AWS account following the steps shown below.
When you click on the word ‘here’ in the banner, you’re shown a simple dialog with two options. Take the first option, to download the template. This will then download a file, named something like peering-32036.yaml, to wherever your browser is configured to save downloaded files. (The numeric part of the file name is unique to your cluster, so don’t be concerned that it’s different than mine).
You can now upload this template to CloudFormation and it will take care of configuring the client side of the VPC peering. Simply click the ‘Upload’ button in the bottom half of the dialog and the template will be uploaded. When the upload completes, you’ll be taken to the CloudFormation ‘Create Stack’ dialog, as shown below.
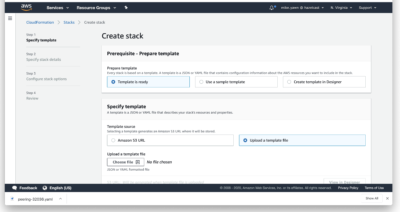
In the top section (Prepare template), select ‘Template is Ready’ (the default setting). In the bottom section (Specify template), select ‘Upload a template file’ (on the right, not the default). Then select ‘Choose file’ and select the peering template file that was downloaded earlier. Then click Next (at the bottom of the page, you may need to scroll to see it).
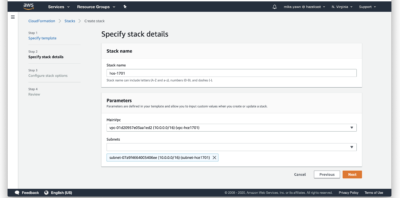
On the next screen, there are 3 pieces of information you’ll need to provide
- The stack name. ‘Stack’ is just a way to refer to all the components created by the template. By default, this will be the same as the cluster name you set earlier.
- You need to select a VPC previously configured in your AWS account (covered in the ‘Setting up an EC2 Client instance’ section above.
- You need to select at least one subnet previously configured in your AWS account (covered in the ‘Setting up an EC2 Client instance’ section above.
Here’s an example of a completed configuration:
When complete, click Next. There is an additional screen of stack options presented, you can accept all defaults here and just click Next again. A final screen is shown for you to review all selected settings (there is also a confirmation checkbox at the bottom you must check), then you can click Create Stack to create the stack.
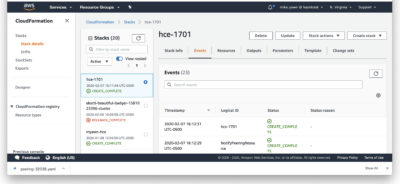
You’ll be shown a progress screen as the stack is created, when complete it will show something like this (this includes a few unrelated stacks created earlier)
Installing, building, and running Client software
Once the secure connection has been established, you can return to the Hazelcast Cloud Enterprise page, where the warning banner will no longer be displayed. Our next step is to configure one or more clients to connect to the cluster. To do this, click the left-hand ‘Configure Clients’ button.
This will bring up the dialog below, where you can select what language you want to use for the client code. (You can repeat the process to generate multiple clients if you like). In this blog, we’ll choose Java, and download the zip file linked in the first bullet item to get a ready-to-build Java client.
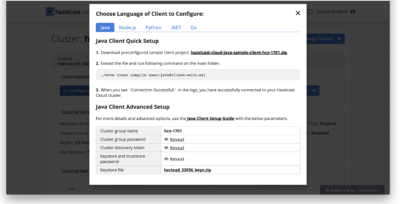
The client file will be downloaded, just as the peering template was, to whatever directory your browser uses to store downloaded files.
Installing, Building, and Running the Client Code
You now need to copy the zip file you just downloaded up to the EC2 client instance that will be used to run the client program. For this, you’ll need to know the path to the keypair (.pem) file that was created when you established your Amazon AWS account, so that both ssh (secure shell) and scp (secure copy) can authenticate you for access to the instance.
Open a terminal window and enter the following command:
> scp -i <path to keypair> <path to client zip> <user>@<ec2-instance>:.
For my specific case, this resolves to (all on one line)
> scp -i ./myawn-keypair.pem ./hazelcast-cloud-java-sample-client-hce-1701.zip [email protected]:.
Once the file has been copied, return to the terminal window that you left open when you logged in to the instance to confirm the connection earlier (or open a new window if the original one is no longer logged in). Do an ‘ls’ command in the home directory to confirm that the zip file of the client code is there. Now we will build and run the client, using the following commands:
> unzip *.zip
> cd hazelcast-cloud*
> sudo amazon-linux-extras install java-openjdk11
> sudo alternatives -config java
(a list of installed java versions will be shown, pick the JDK 11 just installed)
> ./mvnw clean compile exec:java@client-with-ssl
(Note: If you did not select ‘encryption’ when originally setting up the Hazelcast cluster, leave off ‘with-ssl’ here)
At this point, the client should begin running and loading data to the cluster. It will run until it is terminated.
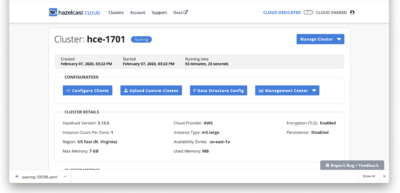
If you go back to the Hazelcast Cloud console, you can observe the map filling. Select the ‘Management Center’ button and the left side, and in the drop-down check the box to enable management center access. You’ll then be prompted to enter the IP address where you’ll access the management center. Make sure you provide an external IP address (i.e., not an address in the 10.x.x.x or 192.x.x.x range). Typing ‘what is my IP address’ into Google is a simple way to get your external IP address. Once you’ve configured this, you will see the Management Center metrics view. You can monitor the increasing memory usage since our client adds entries to the map that are never removed. (Note that Hazelcast Cloud stores map entries in off-heap storage; so heap memory will fluctuate, but native memory will be increasing steadily).
You can stop the client program at any time with Control-C, or if you allow it to run unchecked it will eventually fail when memory has filled.
Next steps
You’ll want to create a client program that does useful business functions, rather than just fill a map with dummy data. If you look at the generated Client program, which you have downloaded to your working system as well as having uploaded it to the client, you’ll see that it has all the logic needed to configure secure access to the cluster. You can copy the portion of the program that establishes the connection and use this as the basis for your new client code.