
Developer, Hazelcast Cloud
During almost 10 years of work in IT industry, Nazar has designed and engineered many complex systems for the companies of different size. Passionate about the Distributed Systems and Cloud Computing, he is always eager to share his knowledge and experience.
View all blogs by the authorJul 24, 2019
Serverless Fraud Detection Using Amazon Lambda, Node.js, and Hazelcast Cloud
Recently, an interesting paper was published by UC Berkeley with their review of serverless computing and quite reasonable predictions:

“…Just as the 2009 paper identified challenges for the cloud and predicted they would be addressed and that cloud use would accelerate, we predict these issues are solvable and that serverless computing will grow to dominate the future of cloud computing.”
So, why should the industry go serverless at all? A simple answer is that we, as software engineers, are eager to be effective and want to focus on the result. Serverless computing is working for that:
- Your cloud provider bill gets lower since you pay only for what you use
- You get more elastic scalability due to the more compact computation units (Functions)
- You do not have to write much of the infrastructure code, which makes the overall system far less complex
- In the end, it is cloud-native, i.e., things like discovery, fault tolerance, and auto-scaling come out of the box
Sounds like something worth adopting, right?
In this tutorial, we will build the complete serverless solution using Amazon Lambda, Node.js, and Hazelcast Cloud – a managed service for fast and scalable in-memory computing.
Problem Overview
Every time your credit or debit card initiates a transaction, the underlying payment system applies various checks to verify transaction validity. There are simple checks, such as verifying available funds. However, others can be far more advanced, such as looking around the history of card payments to identify a personalized pattern and validate the given transaction against it.
For this demo, we are going to use a simplified approach. We will be checking the validity of a limited subset of transactions performed at the airports, and the responsible bank, which in our case is the Bank of Hazelcast. You can also find this problem mentioned initially by my colleague Neil Stevenson in his blog post.
So, let’s go over the entire algorithm step by step.
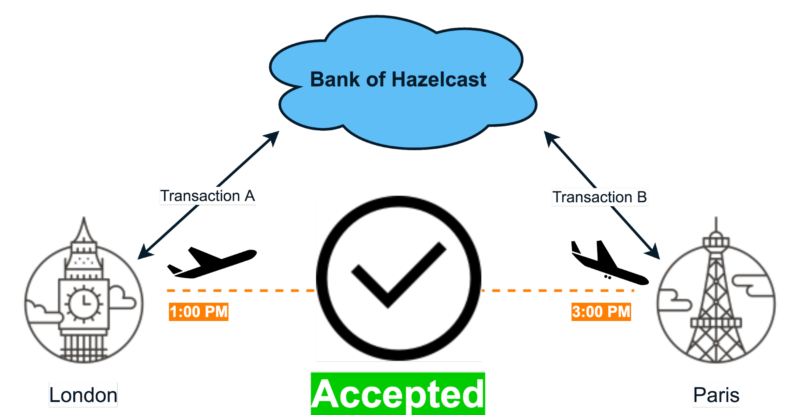
- Consider two transactions, A and B, which take place in different airports:

- What we do is we compare two dimensions:
- The time between transactions A and B
- Distance between given airports (we use their coordinates to calculate that)
By comparing them, we determine whether the person could move from one location to another within a given time frame. More specifically, if transaction A is performed in London and transaction B in Paris, and time between them is not less than two hours, then we consider this a valid scenario:
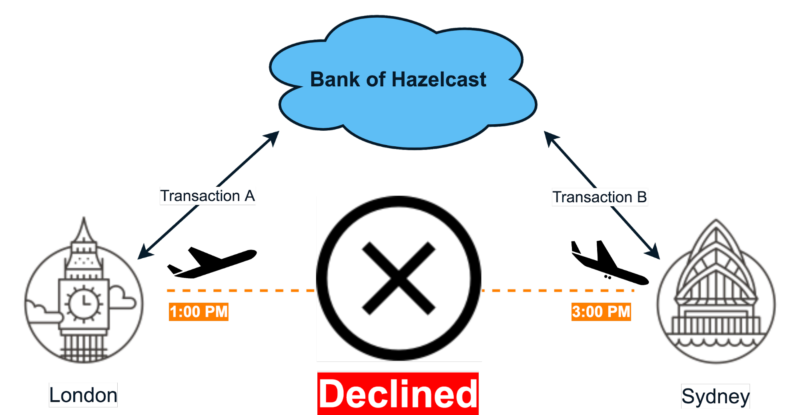
- The opposite example below will be identified as suspicious because Sydney is more than two hours away:
Serverless Solution Design
Now, we will explore the high-level architecture of our serverless solution:
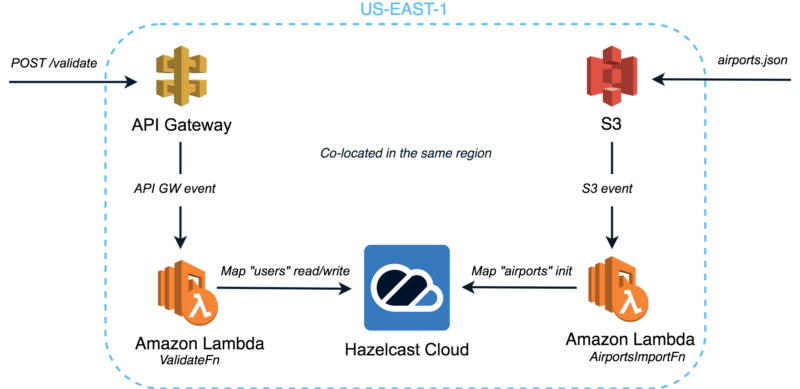
We call it the Complete Serverless Solution since it employs both kinds of the Serverless Components – Function-as-a-Service (FaaS) provided by Amazon Lambda and Backend-as-a-Service (BaaS), a Hazelcast IMDG cluster managed by Hazelcast Cloud. The whole stack is co-located in the same AWS region to ensure the shortest network paths across the components.
As you can see, it’s composed of the following components:
- Amazon S3 which handles uploads of the mostly static dataset with information about airports.
- Lambda Function “AirportsImportFn” which is triggered by the upload into S3 buckets. Once triggered, it imports the dataset into the Hazelcast Cloud cluster so that it can be queried with the lowest latency.
- Amazon API Gateway and Lambda Function “ValidateFn” to serve the HTTP traffic. This Lambda function written in Node.js implements the actual fraud detection logic to validate the received requests. It communicates with the Hazelcast Cloud cluster to manage its state.
- Hazelcast Cloud is a managed service for Hazelcast IMDG—an open source in-memory data grid for fast, scalable data processing. Minimal latency, auto-scaling, and developer-oriented experience—this is why we chose it for our solution.
Node.js Implementation
As mentioned at the beginning, software engineers want to apply an effective solution to the problem. We must be flexible in choosing an appropriate tool while avoiding limitations on programming language, technology, framework, etc. This is how we do it in 2019, right? And this is why we choose Node.js for the Lambda function implementation, one of the modern serverless runtimes supported by the significant FaaS providers.
We all know talk is cheap, so let’s explore the source code.
Lambda Function “AirportsImportFn”
const hazelcast = require('./hazelcast');
const aws = require('aws-sdk');

let sharedS3Client = null;

let getS3Client = () => {
   if (!sharedS3Client) {
       console.log("Creating S3 client...")
       sharedS3Client = new aws.S3();
   }
   return sharedS3Client;
};

exports.handle = async (event, context, callback) => {
   console.log('Got event: ' + JSON.stringify(event));
   context.callbackWaitsForEmptyEventLoop = false;
   let hazelcastClient = await hazelcast.getClient();
   let map = await hazelcastClient.getMap('airports');
   if (await map.isEmpty() && event.Records.length > 0) {
       let srcBucket = event.Records[0].s3.bucket.name;
       console.log('Handling upload into bucket \'' + srcBucket + '\'...');
       let srcKey = decodeURIComponent(event.Records[0].s3.object.key.replace(/\+/g, " "));
       let s3Client = getS3Client();
       let object = await s3Client.getObject({Bucket: srcBucket, Key: srcKey}).promise();
       let airports = JSON.parse(object.Body);
       await map.putAll(airports.map(airport => ([airport.code, airport])));
       console.log('Imported data about ' + airports.length + ' airports');
       return callback(null, true);
   }
   return callback(null, false);
};
So, this is what we implemented:
- Defined a global variable to reuse the S3 client instance between the function invocations (later we will discuss why it’s important)
- Exported function “handle” implements the actual business logic of our Lambda function. It processes the incoming S3 event, reads the JSON contents of the uploaded object, deserializes it into an array, and then re-maps it to key-value pairs before storing in the Hazelcast map
- Finally, we call an Amazon Lambda callback to return the result
Hazelcast Map (IMap) is a distributed hash map. Through the Node.js client, you can perform operations like reading and writing from/to a Hazelcast Map with the well-known get and put methods. For details, see the Map section in the Hazelcast IMDG Reference Manual.
Lambda Function “ValidateFn”
const hazelcast = require('./hazelcast');
const haversine = require('haversine');
const moment = require('moment');

exports.handle = async (request, context, callback) => {
   console.log('Got request: ' + JSON.stringify(request));
   context.callbackWaitsForEmptyEventLoop = false;
   let userId = request.userId;
   let requestTimestampMillis = moment(request.transactionTimestamp).utc().valueOf();
   let hazelcastClient = await hazelcast.getClient();
   let airports = await hazelcastClient.getMap('airports');
   if (await airports.isEmpty()) {
       return callback('Airports data is not initialized', null);
   }
   let users = await hazelcastClient.getMap('users');
   let user = await users.get(userId);
   if (!user) {
       await users.set(userId, {
           userId: userId,
           lastCardUsePlace: request.airportCode,
           lastCardUseTimestamp: requestTimestampMillis
       });
       return callback(null, {valid: true, message: 'User data saved for future validations'});
   }
   let [lastAirport, nextAirport] = await Promise.all([airports.get(user.lastCardUsePlace),
       airports.get(request.airportCode)]);
   if (lastAirport.code === nextAirport.code) {
       return callback(null, {valid: true, message: 'Transaction performed from the same location'});
   }
   let speed = getSpeed(lastAirport, user.lastCardUseTimestamp, nextAirport, request.transactionTimestamp);
   let valid = speed <= 13000; // 800 km/hr == ~13000 m/min let message = valid ? 'Transaction is OK' : 'Transaction is suspicious'; // Update user data user.lastCardUsePlace = request.airportCode; user.lastCardUseTimestamp = requestTimestampMillis; await users.set(userId, user); return callback(null, {valid: valid, message: message}); }; let getSpeed = (lastAirport, lastUseTimestamp, nextAirport, requestTimestamp) => {
   // Time
   let minutes = moment(requestTimestamp).diff(lastUseTimestamp, 'minutes');
   // Distance
   let meters = haversine(nextAirport, lastAirport, {unit: 'meter'});
   // Speed
   return meters / minutes;
};
Here is what we do step by step:
- First, we set
context.callbackWaitsForEmptyEventLoop = false;
which is the Amazon Lambda-specific setting to prevent waiting until the Node.js runtime event loop is empty. Here you can find more info about the given setting.
- Then our validation logic checks whether we already have any data for a user associated with the incoming request. If it’s a new user, we save it for the future validations and return a corresponding result:
{valid: true, message: 'User data saved for future validations'} - If there is available data about the previous transaction, we proceed by retrieving info about the current and prior airports
let [lastAirport, nextAirport] = await Promise.all([airports.get(user.lastCardUsePlace),
   airports.get(request.airportCode)]);
and skip the validation if the airports are the same:
{valid: true, message: 'Transaction performed from the same location'} - After which, we use the haversine formula to calculate a “user speed” between two transactions. If it’s bigger than an average plane’s speed, we conclude that the transaction is suspicious:
let valid = speed <= 13000; // 800 km/hr == ~13000 m/min
let message = valid ? 'Transaction is OK' : 'Transaction is suspicious';
At the end of our algorithm, we store the data from the request for the future validations:
await users.set(userId, user);
Hazelcast Client Module
To better organize our codebase, we’ve extracted the Node.js Hazelcast Client setup into a separate module within hazelcast.js:
const Client = require('hazelcast-client').Client;
const ClientConfig = require('hazelcast-client').Config.ClientConfig;

let sharedHazelcastClient = null;

let createClientConfig = () => {
   let cfg = new ClientConfig();
   cfg.groupConfig.name = process.env.GROUP;
   cfg.groupConfig.password = process.env.PASSWORD;
   cfg.networkConfig.cloudConfig.enabled = true;
   cfg.networkConfig.cloudConfig.discoveryToken = process.env.DISCOVERY_TOKEN;
   cfg.properties['hazelcast.client.cloud.url'] = 'https://coordinator.hazelcast.cloud';
   cfg.properties['hazelcast.client.statistics.enabled'] = true;
   cfg.properties['hazelcast.client.statistics.period.seconds'] = 1;
   cfg.properties['hazelcast.client.heartbeat.timeout'] = 3000000;
   return cfg;
};

module.exports.getClient = async () => {
   if (!sharedHazelcastClient) {
       console.log('Creating Hazelcast client...');
       sharedHazelcastClient = await Client.newHazelcastClient(createClientConfig());
   }
   return sharedHazelcastClient;
};
The main idea here is to re-use the Hazelcast Client instance between invocations. This is an optimization which is still available even though you deal with the ephemeral and stateless Function containers. Learn more about the Amazon Lambda function lifecycle in this corresponding article from AWS Compute Blog. Also, worth mentioning is that Hazelcast settings are configured via environment variables—this is one of the suggested ways to configure the Lambda Function instance. Later, we will see how to set them.
Deployment
And the final spurt—we need to deploy the whole solution to your AWS account. Here are the steps:
1. We will start by creating our Lambda functions and the first candidate will be “ImportAirportsFn”—the function triggered by upload into the S3 bucket. A minimal deployment package for Amazon Lambda Node.js environment consists of the actual JS file with function handler and the required libraries for your code. Both should be zipped and passed as an argument to AWS CLI create-function command:
$ zip -r import.zip import.js hazelcast.js node_modules$ aws lambda create-function --function-name --role lambda_role_arn --zip-file fileb://import.zip --handler import.handle --description "Imports Airports from S3 into Hazelcast Cloud" --runtime nodejs8.10 --region us-east-1 --timeout 30 --memory-size 256 --publish --profile aws_profile
Let’s quickly review the arguments:
- ImportAirportsFn – a logical function name
- lambda_role_arn – beforehand you should create a Lambda Execution Role with the given policy attached; it gives basic permission to upload the logs and to read data from S3
- aws_profile – here we use AWS Profile-based access to work with AWS CLI
- us-east-1 – region that we’re going to use for our deployment
- import.handle – this is for Amazon Lambda to lookup the function handler; it’s set in the format js_file_name.exported_function_name
After this, we should run just two more commands to make our function triggered by the uploads into S3 bucket:
$ aws lambda add-permission --function-name ImportAirportsFn --action lambda:InvokeFunction --principal s3.amazonaws.com --source-arn s3_bucket_arn --statement-id ncherkas-js-demo-lambda-permission --region us-east-1 --profile aws_profile
Where s3_bucket_arn – ARN of the S3 bucket which has a simple format like “arn:aws:s3:::your_bucket_name” and ncherkas-js-demo-lambda-permission – a logical id for the permission instance.
$ aws s3api put-bucket-notification-configuration --bucket your_bucket_name --notification-configuration file://s3_notification.json --profile aws_profile --region us-east-1
For this last one, you can use a sample notification config here. Just replace “LambdaFunctionArn” inside of it with a valid ARN of the Lambda Function.
Please note that the S3 bucket should be created beforehand. I’d suggest placing it in the same AWS region i.e., us-east-1
2. Now let’s set up the Hazelcast Cloud cluster so that we can start using it for the low-latency state management required by our Lambda Functions. Go https://cloud.hazelcast.com and create your account by clicking “Launch For Free.” Once you’ve entered a console, proceed by creating a new Hazelcast cluster:

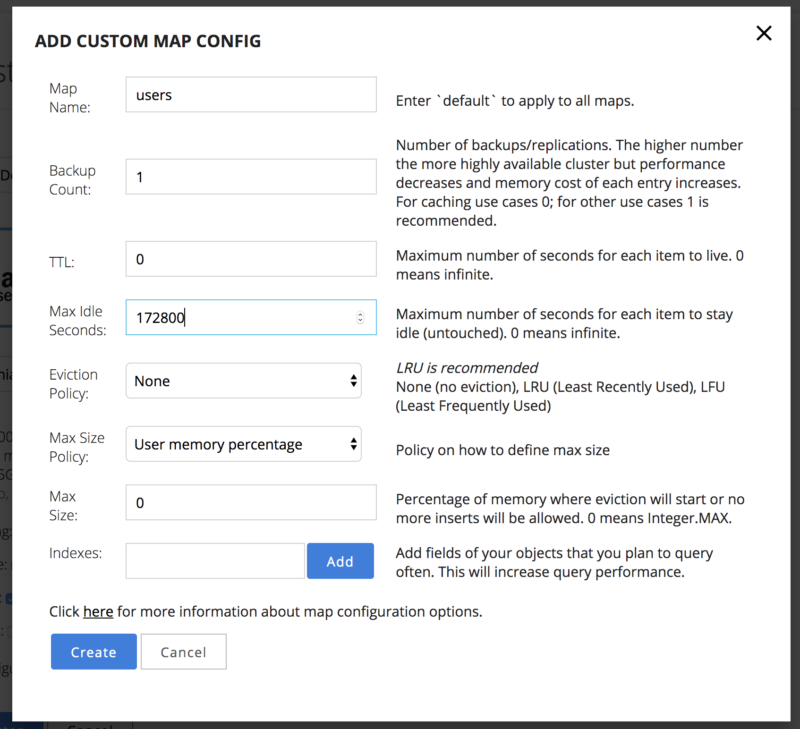
Before pressing “+ Create Cluster,” click on “+Add” button next to the “Custom Map Configuration” setting to specify an expiration time for the user data we’re going to store. We do this for the user data since we don’t need to save it for a period of more than a few days; this is an excellent chance to optimize our storage!
After this, press “+Create Cluster” and let’s have a brief overview of the options we specified for our Hazelcast Cluster:
- Cloud Provider – a cloud provider that you want to use, which is AWS in the case of our tutorial
- Region – AWS region that you’re going to use; let’s set the same region that we use for our Lambda Functions, i.e., us-east-1
- Cluster Type – a bunch of options available here; let’s leverage trial 50 $ and go with a Small type
- Enable Auto-Scaling – when it’s ON, our cluster will automatically increase its capacity as the amount of stored data increases
- Enable Persistence – backed with the Hazelcast Hot Restart Persistence; this avoids losing our data between the Hazelcast Cluster restarts
- Enable Encryption – this is what you’d like to enable if you process the real payment transactions. Under the hood, it leverages the Hazelcast Security Suite
- Enable IP Whitelist – this is again what you’d want to switch ON when you set up a production environment
Now we have our Hazelcast Cluster up and running, but what’s next? How to connect to it? This is quite easy to do—go and click “Configure Client” to see what’s available: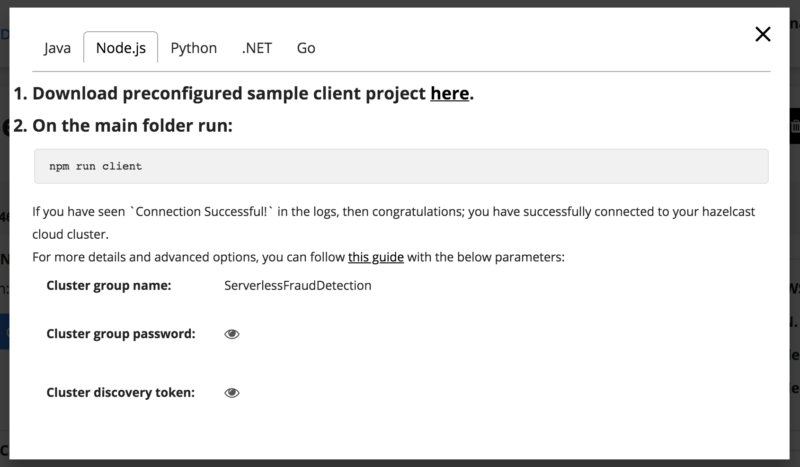
Here, you have two options. You can download a ready code sample which is working with your cluster. Or, as we will do in the case of Lambda Function, you can configure your client manually. As you remember from the source code, we configure our client using the environment variables, but how do they propagate to our Lambda Function? Here is a command that we need to run:
$ aws lambda update-function-configuration --function-name ImportAirportsFn --environment Variables="{GROUP=<cluster_group_name>,PASSWORD=<password>,DISCOVERY_TOKEN=<token>" --profile aws_profile --region us-east-1
In this command, we take cluster_group_name, password, and token from the “Configure Client” dialog that we were exploring above.
Now, let’s have some fun and test our Lambda Function “ImportAirportsFn”. To do this, upload the given sample file with the airport’s data into S3 bucket that we created earlier in this tutorial. Once complete, go to Amazon Cloud Watch Console, click “Logs” and open a stream called “/aws/lambda/ImportAirportsFn”. Inside of the stream the recent logs will go on the top; let’s explore them:
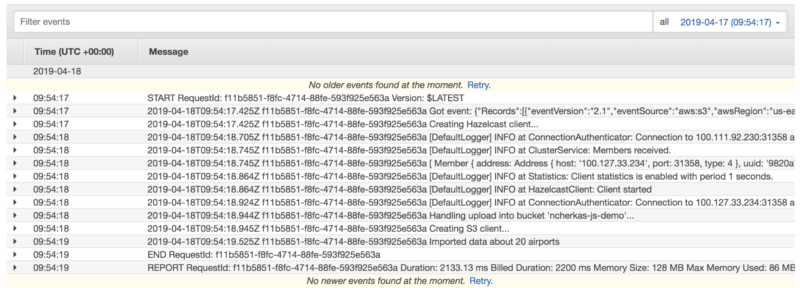
As you can see, our dataset with the airport’s data was successfully copied into the corresponding Hazelcast map. Now we can query it to validate the payment transactions; this is what we want to have at the end—the serverless fraud detection. Let’s move on and complete the last deployment step.
3. Creating Lambda Function “ValidateFn” and setting up the Amazon API Gateway.
Run the AWS CLI command to create a new function:
$ zip -r validate.zip validate.js hazelcast.js node_modules

$ aws lambda create-function --function-name ValidateFn --role lambda_role_arn --zip-file fileb://validate.zip --handler validate.handle --description "Validates User Transactions" --runtime nodejs8.10 --environment Variables="{GROUP=<cluster_group_name>,PASSWORD=<password>,DISCOVERY_TOKEN=<token>}" --region us-east-1 --timeout 30 --memory-size 256 --publish --profile aws_profile
As you can see, we establish the Hazelcast Cluster settings right away since our cluster is already up and running.
Before proceeding with the API gateway, we can quickly test our function within the AWS console:
1) Click “Select a test event” and configure a test JSON payload:
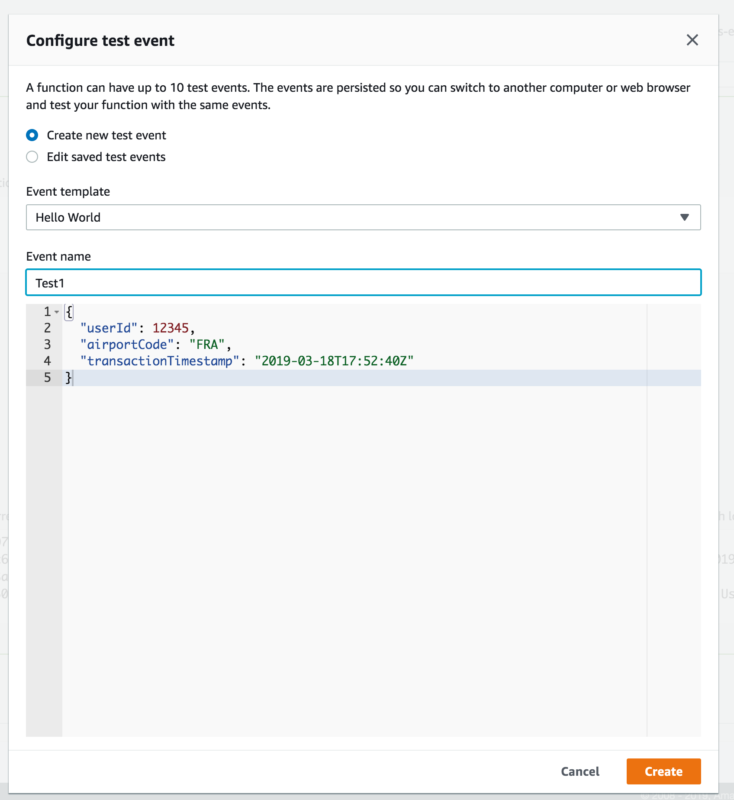
2) Click “Test” and explore the results:
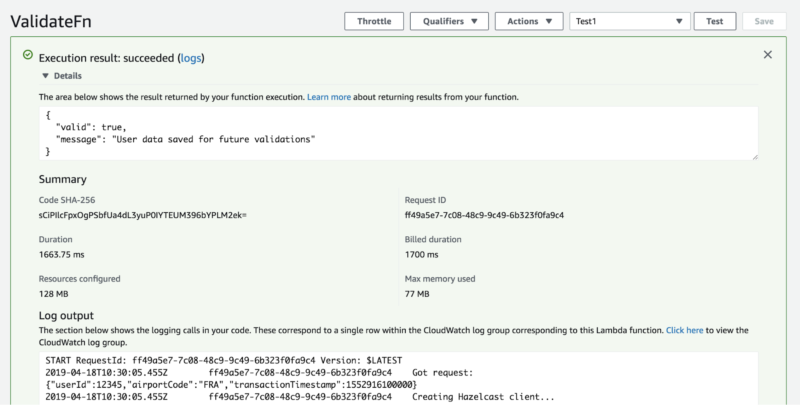
Congrats! You’re now very close to getting the complete solution up and running!
And the last, yet crucial step—setting up the API gateway endpoint.
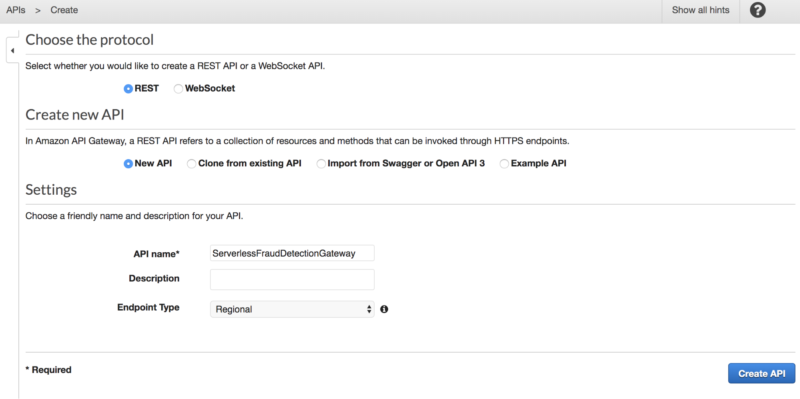
Go to Amazon API gateway and create a new API:
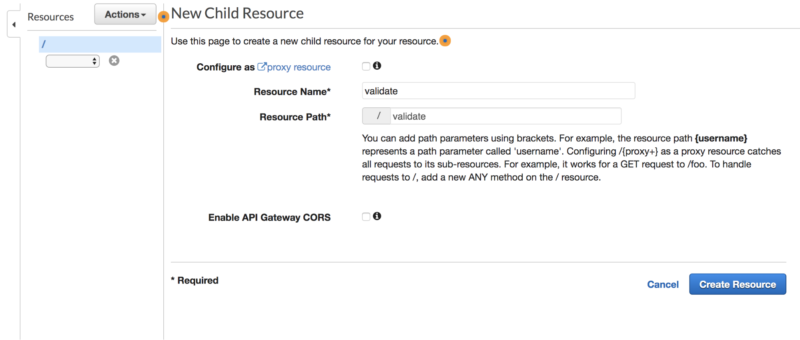
Then, create a new API Resource:
And add a POST mapping for our API:
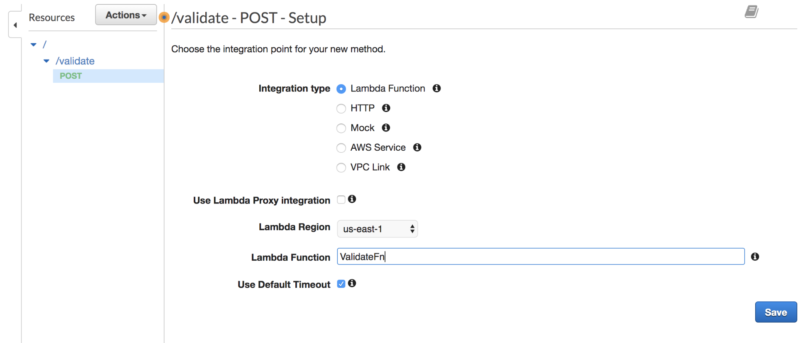
Choose OK when prompted with Add Permission to Lambda Function.
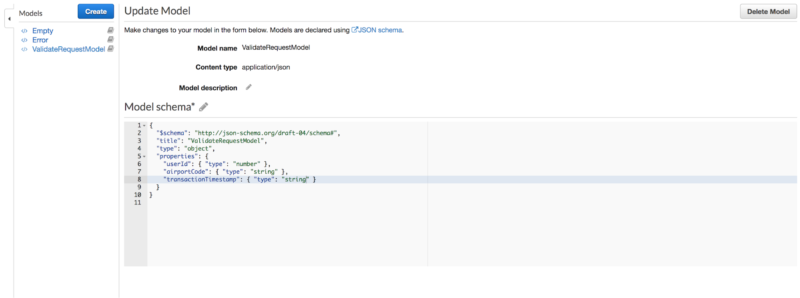
After this, we need to configure a request body mapping. Go to “Models” under the newly created API and create a new model:
Then click on POST method and press “Method Request” to apply this mapping model:

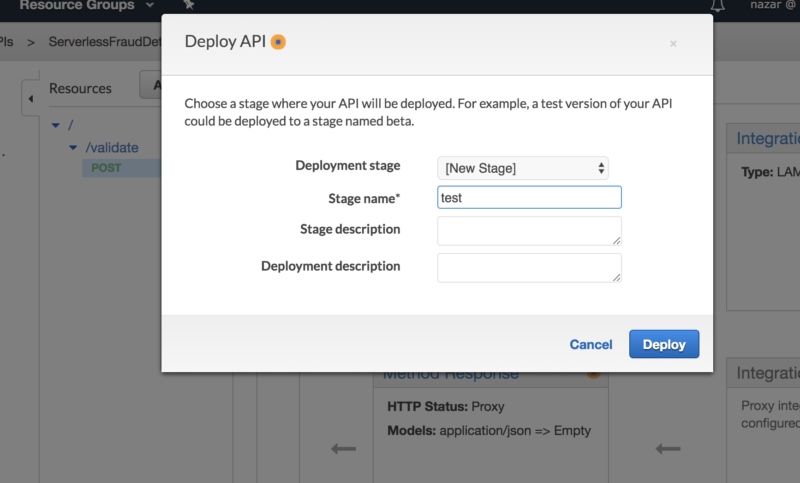
We are ready now to deploy and test the Validate API. To do this, go Actions – Deploy API and create a new stage:
After it’s deployed, you will get the Invoke URL that exposes our newly created API. Let’s use this URL and do final testing (here I use HTTPie, which is an excellent alternative to cURL):
$ http POST <invoke_url>/validate userId:=12345 airportCode=FRA transactionTimestamp=2019-03-18T17:55:40Z

{
    "message": "Transaction performed from the same location",
    "valid": true
}
Now, let’s try to emulate a suspicious transaction. The previous request was performed at Mon Mar 18 2019 13:51:40 in Frankfurt, so let’s send another request for the transaction performed in New York, a few minutes later:
$ http POST <invoke_url>/validate userId:=12345 airportCode=EWR transactionTimestamp=2019-03-18T18:02:10Z

{
    "message": "Transaction is suspicious",
    "valid": false
}
We get “valid”: false since it’s unrealistic for the person to move from Frankfurt to New York in that short period.
And one more example, a valid transaction:
$ http POST <invoke_url>/validate userId:=12345 airportCode=LCY transactionTimestamp=2019-03-19T02:20:30Z

{
    "message": "Transaction is OK",
    "valid": true
}
Here, we have “valid”: true because the given transaction was performed from London later at night, which seems reasonable.
Also, it makes sense to inspect the performance of our solution. Below, you can see a graph of the average latency after running a simple 10-minute test, continuously sending validate requests to the API Gateway URL:
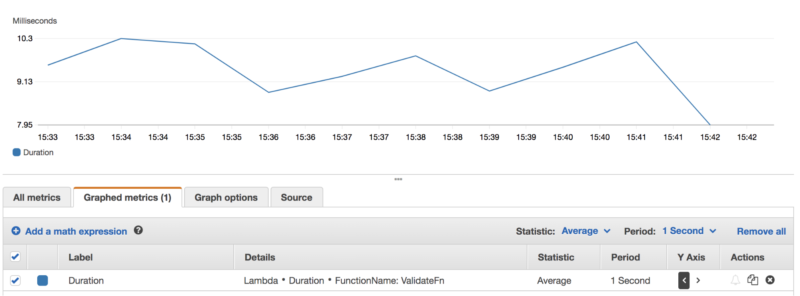
As you can see, the average duration of ValidateFn function was mostly less than 10 ms. during this test. This confirms the choice we’ve made by solving our problem with the in-memory computing solution. Note that in the case of Amazon Lambda, the less your latency is, the less you pay for the usage, so using the In-Memory Computing solution helps to reduce the processing costs.
Impressive! At this point, Serverless Fraud Detection is up and running! Thanks for joining me on this journey!
Now, for a summary…
After all is said and done
This tutorial has shown that serverless computing is not just hype, but is something worth learning and adopting. With reasonable efforts, you get a scalable, fault-tolerant, and performant solution with in-memory computing enhancing all of these attributes. Check out our community site to learn more cool things you can do with the Hazelcast Node.js Client and Hazelcast Cloud.