Hazelcast on GCP (google cloud platform) part 1
Piotr Szybicki recently published this blog post with the title, “Hazelcast on GCP (google cloud platform) part 1“. In this post, Piotr discusses the process of deploying and securing a Hazelcast IMDG cluster in GCP (Google Cloud Platform).

In this article I am going to discuss the process of deploying, securing the Hazelcast cluster in to the GCP (Google Cloud Platform). And in the next I will move on to create Docker image and take advantage of the auto-scaling features of the platform.
Hazelcast
Not going to do the long introduction on what the Hazelcast is, I assume that if you are reading this article you know that it is in memory, distributed data grid. It allows you to access your data much faster than traditional database, replicate them among other machines in the cluster, so in case of a node failure no data is lost. It is written in Java, and runs on top of the JVM. I use a very simple java API to access information stored in the node.
Hazelcast cluster configuration
There is a bunch of nodes that you can tune to make Hazelcast work the way you want and for that I invite you to read the documentation. It is one of the best written cohesive and well organized. I will cover only the one that I need. Bellow there is a snippet of xml configuration copied from sample project ( it will be on git hub, link at the bottom)
<group>
    <name>gcp-cluster</name>
</group>
<network>
    <port auto-increment="false">5701</port>
    <join>
        <multicast enabled="false" />
        <tcp-ip enabled="true">
            <interface>192.168.1.2</interface>
            <interface>192.168.1.3</interface>
        </tcp-ip>
    </join>
    <interfaces enabled="false"/>
</network>
<map name="example-map">
    <backup-count>1</backup-count>
    <time-to-live-seconds>0</time-to-live-seconds>
    <max-idle-seconds>0</max-idle-seconds>
    <eviction-policy>NONE</eviction-policy>
    <eviction-percentage>25</eviction-percentage>
    <merge-policy>hz.ADD_NEW_ENTRY</merge-policy>
</map>
First we specify the name of the cluster, it is a basic form of security as members that do not have that name specified will not be able to join. Then I specify the port number that I want my node to listen to. Auto-increment set to false means that I want my node to listen on that port and not any other. The feature is useful when we have multiple nodes on single vm-s. That way if the port specified is busy the +1 will be added to the base port and that number will be tried. Next line we set the multicast to false. That is because VPC (Virtual Private Cloud, more on the subject in the next paragraph) network does not support the multicast. That is why the list of host is specified in advance (there is a way around that and I will discuss it in the next article)
Next we specify the parameters of our distributed map. Hazelcast has all of the basic Java data structures implemented (Map, Set , List, Queue, MultiMap, Topic). It is worth noticing that the configuration in xml, can easily be done in java, or not at all as Hazelcast can create them with some reasonable defaults.
For the description of parameters you can set in Map I invite you to study the reference manual. Although I don’t expect for the meaning of the parameters to change some features are added over time. Also I do not want to create an imperfect copy of something that was written by an expert on the matter.
Hazelcast IMDG Reference Manual
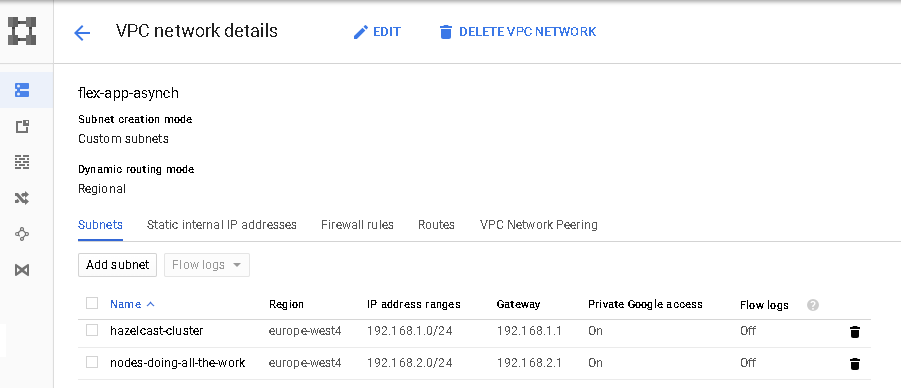
VPC network on GCP
VPC (Virtual Privet Cloud) are a networking backbone of any deployment. You can’t provision any kind of computing resource without assigning it VPC. I will do a separate tutorial on the subject. So for now I only explain what is needed to make our cluster up and running.
First delete the default VPC (it is good practise, and we will be creating everything from scratch anyway). You can do it on a details page, after you click on the name of the VPC.

Create empty VPC (without any subnets, we will add those in a second)
Now let’s create a 2 subnets. Two subnets as we will have a different firewall rules for nodes running the Hazelcast cluster and different for running http trafic. A little bit of notice in this tutorial i will be using the console and gcloud tool for almost everything. We are hackers and let’s have some self respect.
gcloud compute networks subnets create hazelcast-nodes-subnet \
   --network flex-app-asynch \
   --region europe-west4 \
   --range 192.168.1.0/24 \
   --project "name of your project"
gcloud compute networks subnets create web-nodes-subnet \
   --network flex-app-asynch \
   --region europe-west4 \
   --range 192.168.2.0/24 \
   --project "name of your project"
CIDR notation
A little bit of a side note. When I created the subnets i had to specify a range.(192.168.1.0/24) And I want to give you the link to this great article on the subject of networking. I simply do not want to repeat something that was explain better by someone else. General take away in order to avoid CIDR collisions keep the address range tight.
Understanding IP Addresses, Subnets, and CIDR Notation for Networking
Firewall rules
Now because we want to run a secure infrastructure we need to secure ourselves with the first line of defence. First let’s deny all possible traffic to all our machine on all available ports. We create it with the priority 65535 (lowest possible) that means any rule that we create from now on will be evaluated first. I did not specify the target for the rule, that means that it apply to all machines in the VPC.
gcloud compute firewall-rules create deny-access-to-all-tcp \
    --network flex-app-asynch \
    --action deny \
    --direction ingress \
    --rules tcp \
    --source-ranges 0.0.0.0/0 \
    --priority 65535 \
    --project "name of your project"

gcloud compute firewall-rules create deny-access-to-all-udp \
    --network flex-app-asynch \
    --action deny \
    --direction ingress \
    --rules udp \
    --source-ranges 0.0.0.0/0 \
    --priority 65535 \
    --project "name of your project"
Now I will open the port 22 for the ssh access. The way the rule is constructed it will allow access from a single IP address. In this case my home computer.
gcloud compute firewall-rules create allow-ssh-from-my-machine \
 --network flex-app-asynch \
 --action allow \
 --direction ingress \
 --rules tcp:22 \
 --source-ranges 71.8.3.21/32 \
 --priority 1000 \
 --project "name of your project"
And also we have to allow the traffic between hazelcast nodes (port 5701, the port is specified in the xml file). We specify the both source and target-tags to be the same. It means that instances with this tag can talk to each other on this port. Network Tags are just convenient way of identifying a group of nodes. We will come back to this during creation of our nodes.
gcloud compute firewall-rules create allow-node-connection \
 --network flex-app-asynch \
 --action allow \
 --direction ingress \
 --rules tcp:5701 \
 --source-tags hazelcast-node \
 --target-tags hazelcast-node \
 --priority 1 \
 --project "forexsignals-404f2"
Compute engine instance
First we need a list of all instances available on gcp. It is needed because the names of available images may change. So run following command in the console:
gcloud compute images list --project "name of your project"
The outputh shuld look like this find the centos-7 on the list.

Ok. Now that we have that let’s create our instances (just replace hazelcast-node-1 with hazelcast-node-2 and run the command again). The rest i i will explain once but you have to repeat every step for every machine that you provision. Notice the tags flag. We mentioned that during creation of our firewall rules.
gcloud compute instances create hazelcast-node-1 \
--machine-type f1-micro \
--image-family centos-7 \
--image-project centos-cloud \
--subnet hazelcast-nodes-subnet \
--zone europe-west4-c \
--tags hazelcast-node \
--project "name of your project"
 you should see a successful creation message
The second command is so you can connect to the machine via the ssh (you should have a PuTTY installed). And install JDK (the second command)
gcloud compute --project "name of your project" \
  ssh --zone "europe-west4-c" "hazelcast-node-1"

sudo yum install java-1.8.0-openjdk
Go to the project directory (describe in the next paragraph) and copy the jar file to the the instance.
gcloud compute scp .\build\libs\demo-1.0.0-SNAPSHOT.jar hazelcast-node-1:/tmp --project "name of your project" --zone "europe-west4-c"
Now we can run our app from both nodes. And hopefully see the following entery in the logs.

Summary
This is a silly process. And in production systems you would never do this. But i wanted to show that it can be done. And learn a little bit gcloud commands in the process. In the next part I will cover how we can use kubernetes to do the same job much faster. Take advantage of the auto-discovery mechanism and ability to scale under load.
You might have noticed that at the beginning i told you to create the second subnet for the http traffic and finally we didn’t do anything with it. That is on purpose, this article was getting a little bit too long so I will cover it in the next.
Three if you want to avoid set -project flag in all your command you can just run the following to command and it will save in the session of you command prompt those variables.
gcloud config set compute/zone europe-west4-c
gcloud config set project forexsignals-404f2
The code for this article can be found:
Just go to the directory and run: gradle bootJar it will create the necessary files.