AWS Auto Scaling with Hazelcast
Note: This blog was originally published in May 2018, but has since been updated with the latest information.

In this blog post, I explain how to set up a Hazelcast cluster using AWS EC2 Auto Scaling mechanism. I also give a step-by-step example and justify why other, more trivial solutions may fail.
Introduction
AWS offers an Auto Scaling feature, which allows to dynamically provision EC2 instances depending on specific metrics (CPU, network traffic, etc.). This feature perfectly fits the needs of a Hazelcast cluster.
Hazelcast Requirements
Notice that Hazelcast has specific requirements:
- the number of instances must change by 1 at the time
- when an instance is launched or terminated, the cluster must be in the safe state
Otherwise, there is a risk of a data loss or an impact on the performance.
Recommended Solution
The recommended solution is to use Auto Scaling Lifecycle Hooks with Amazon SQS and a custom Lifecycle Hook Listener script. Note however that, if your cluster is small and predictable, then you can try an alternative solution mentioned in the conclusion.
AWS Auto Scaling Architecture
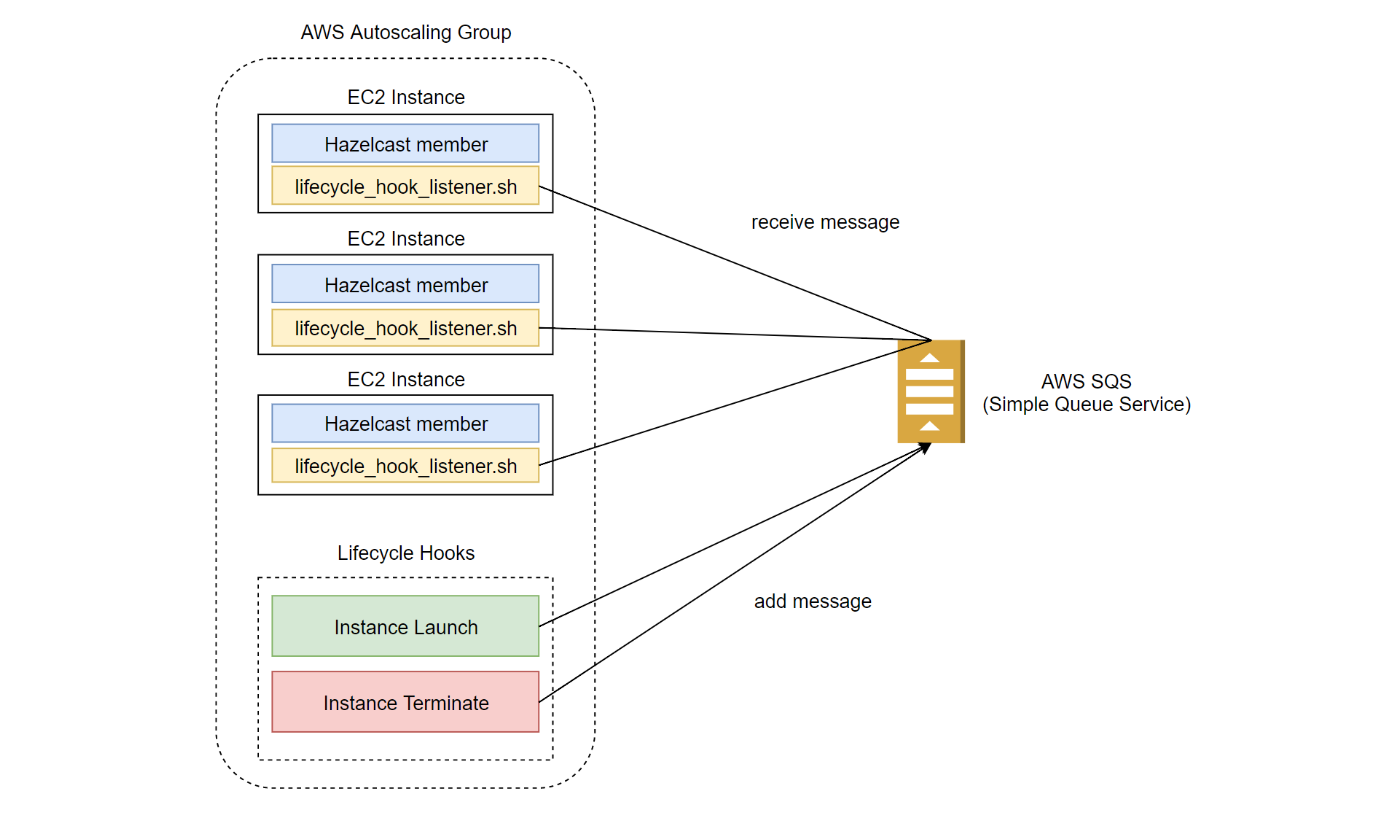
We are going to build the following AWS Auto Scaling architecture.

Setting it up requires the following steps:
- Create AWS SQS queue
- Create Amazon Machine Image which includes Hazelcast and Lifecycle Hook Listener script
- Create Auto Scaling Launch Configuration
- Create Auto Scaling Group
- Create Lifecycle Hooks
Let’s see how to set it up.
Step-by-step Guide
Create Amazon SQS (Simple Queue Service)
As the first step you need to create an SQS queue which will be used for Autoscaling Group Lifecycle Hook events. Assuming you already executed aws configure and set your default region to eu-central-1, you can execute the following command.
aws sqs create-queue --queue-name=autoscaling-queue
You can check that the queue was created successuly at https://eu-central-1.console.aws.amazon.com/sqs.

Create AMI (Amazon Machine Image) with Hazelcast
As the next step we need to create AWS image which will be used for the Autoscaling group.
- Launch a new EC2 Instance “Ubuntu Server”
- SSH into the launched instance
- Install Hazelcast and related libraries
sudo apt update && sudo apt install -y default-jre unzip
sudo chmod a+wr /opt && && mkdir /opt/hazelcast && cd /opt/hazelcast
wget https://download.hazelcast.com/download.jsp?version=hazelcast-4.0.1 -O hazelcast.zip
unzip hazelcast.zip && rm -f hazelcast.zip
wget https://raw.githubusercontent.com/hazelcast/hazelcast-code-samples/master/hazelcast-integration/aws-autoscaling/hazelcast.yaml
- Update Hazelcast configuration
/opt/hazelcast/hazelcast.yamlwithYOUR_AWS_ACCESS_KEYandYOUR_AWS_SECRET_KEY(alternatively you can assign the needed IAM Role to the EC2 Instance) - Download lifecycle_hook_listener.sh
sudo apt install -y jq
wget https://raw.githubusercontent.com/hazelcast/hazelcast-code-samples/master/hazelcast-integration/aws-autoscaling/lifecycle_hook_listener.sh -O /opt/lifecycle_hook_listener.sh
chmod +x /opt/lifecycle_hook_listener.sh
- Install and configure AWS CLI
sudo apt install -y awscli
aws configure
- Create AWS Image from the running EC2 Instance
You can check that the image was successfully created at https://eu-central-1.console.aws.amazon.com/ec2/v2/home?region=eu-central-1#Images.

Create Auto Scaling Launch Configuration
Before you create Auto Scaling Group, you need to prepare the configuration of how you want to start EC2 Instance. Proceed with the following steps:
- Open AWS Auto Scaling Launch Configuration console: https://eu-central-1.console.aws.amazon.com/ec2/autoscaling/home?region=eu-central-1#LaunchConfigurations
- Click on “Create Launch configuration”, select “My AMI”, and choose the created image
- In the “Create Launch Configuration” step, in the “User Data” field, add the following script
#!/bin/bash
export JAVA_OPTS='-Dhazelcast.config=/opt/hazelcast/hazelcast.yaml'
/opt/hazelcast/bin/start.sh &
/opt/lifecycle_hook_listener.sh <sqs-name>
- Don’t forget to set up the security group which allows traffic to the Hazelcast member (open port 5701)
- Click on “Create launch configuration”
You should see that the Auto Scaling launch configuration has been created.

Create Auto Scaling Group
Finally, you can create Auto Scaling Group with the following steps.
- Open AWS Auto Scaling Group console: https://eu-central-1.console.aws.amazon.com/ec2/autoscaling/home?region=eu-central-1#AutoScalingGroups
- Click “Create Auto Scaling group”, select the created launch configuration, and click “Next Step”
- Enter “Group Name”, “Network”, and “Subnet” and click on “Next: Configure scaling policies”
- Configure scaling policies:
- Select “Use scaling policies to adjust the capacity of this group”
- Choose the max and min number of instances
- Select “Scale the Auto Scaling group using step or simple scaling policies”
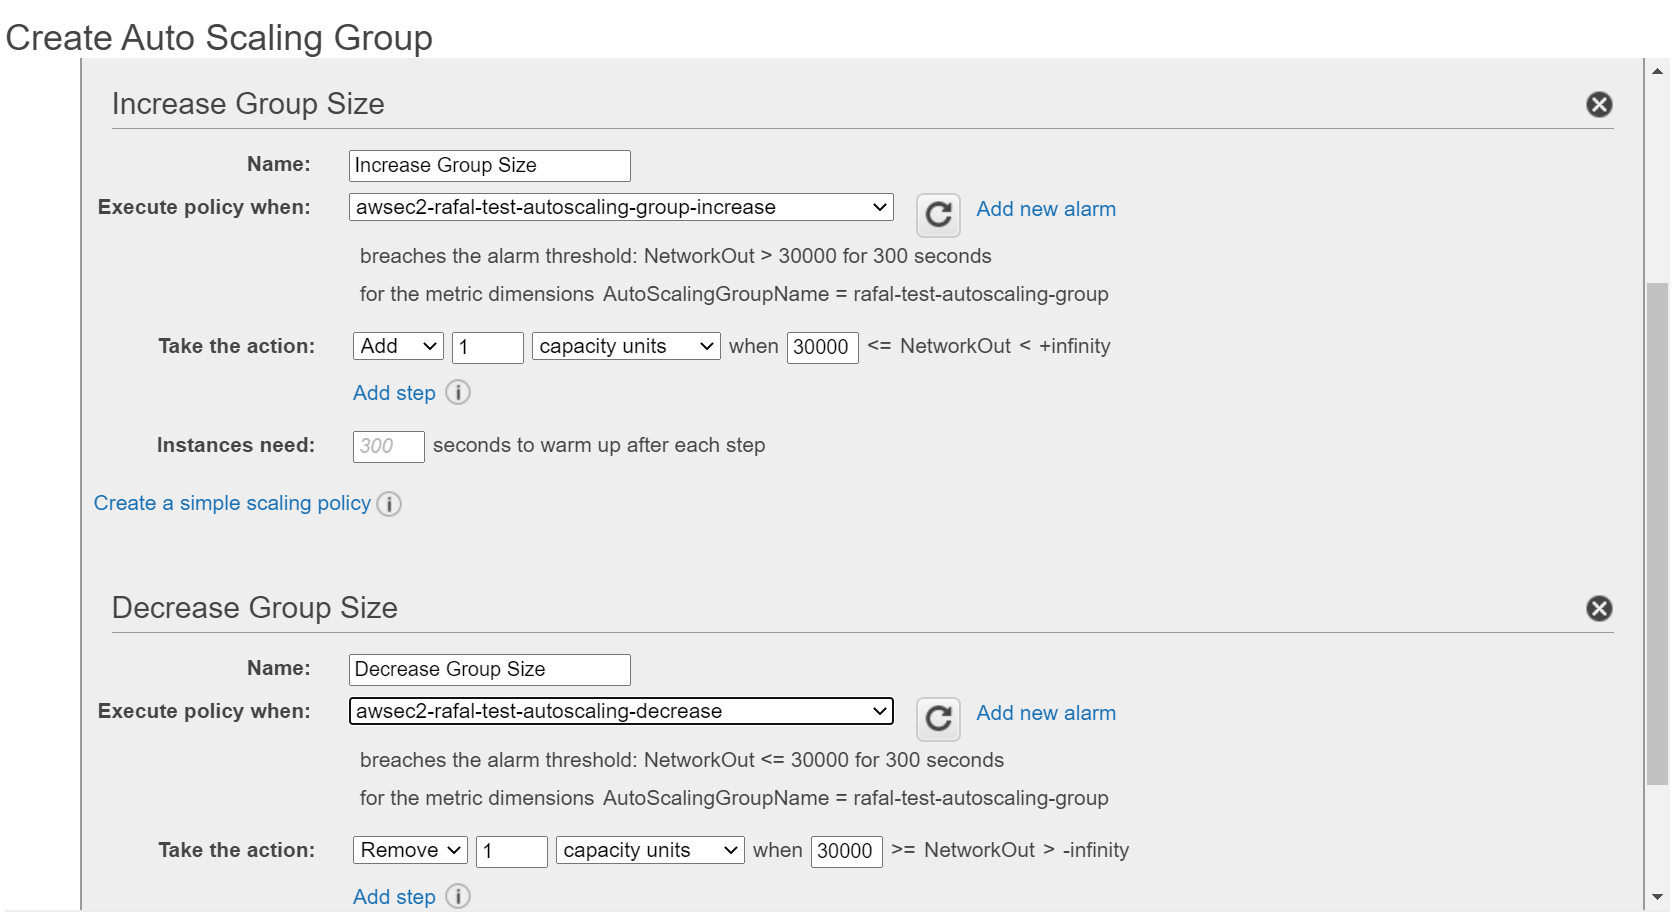
- Choose (or create) alarms: for “Increase Group Size” and “Decrease Group Size”
- Specify to always Add and Remove 1 instance

- Click “Review” and “Create Auto Scaling group”
The Auto Scaling group should be visible in the AWS console.

Create Lifecycle Hooks
As the last step, we need to create Lifecycle Hooks. Otherwise, Hazelcast members wouldn’t wait before migrating its data, so we could experience data loss.
- Create IAM Role that is allowed to publish to SQS (for details, refer to AWS Lifecycle Hooks, Receive Notification Using Amazon SQS)
- Check SQS ARN in SQS console: https://console.aws.amazon.com/sqs/home
- Create Instance Launching Hook
aws autoscaling put-lifecycle-hook --lifecycle-hook-name <launching-lifecycle-hook-name> --auto-scaling-group-name <autoscaling-group-name> --lifecycle-transition autoscaling:EC2_INSTANCE_LAUNCHING --notification-target-arn <queue-arn> --role-arn <role-arn> --default-result CONTINUE
- Create Instance Terminating Hook
aws autoscaling put-lifecycle-hook --lifecycle-hook-name <terminating-lifecycle-hook-name> --auto-scaling-group-name <autoscaling-group-name> --lifecycle-transition autoscaling:EC2_INSTANCE_TERMINATING --notification-target-arn <queue-arn> --role-arn <role-arn> --default-result ABANDON
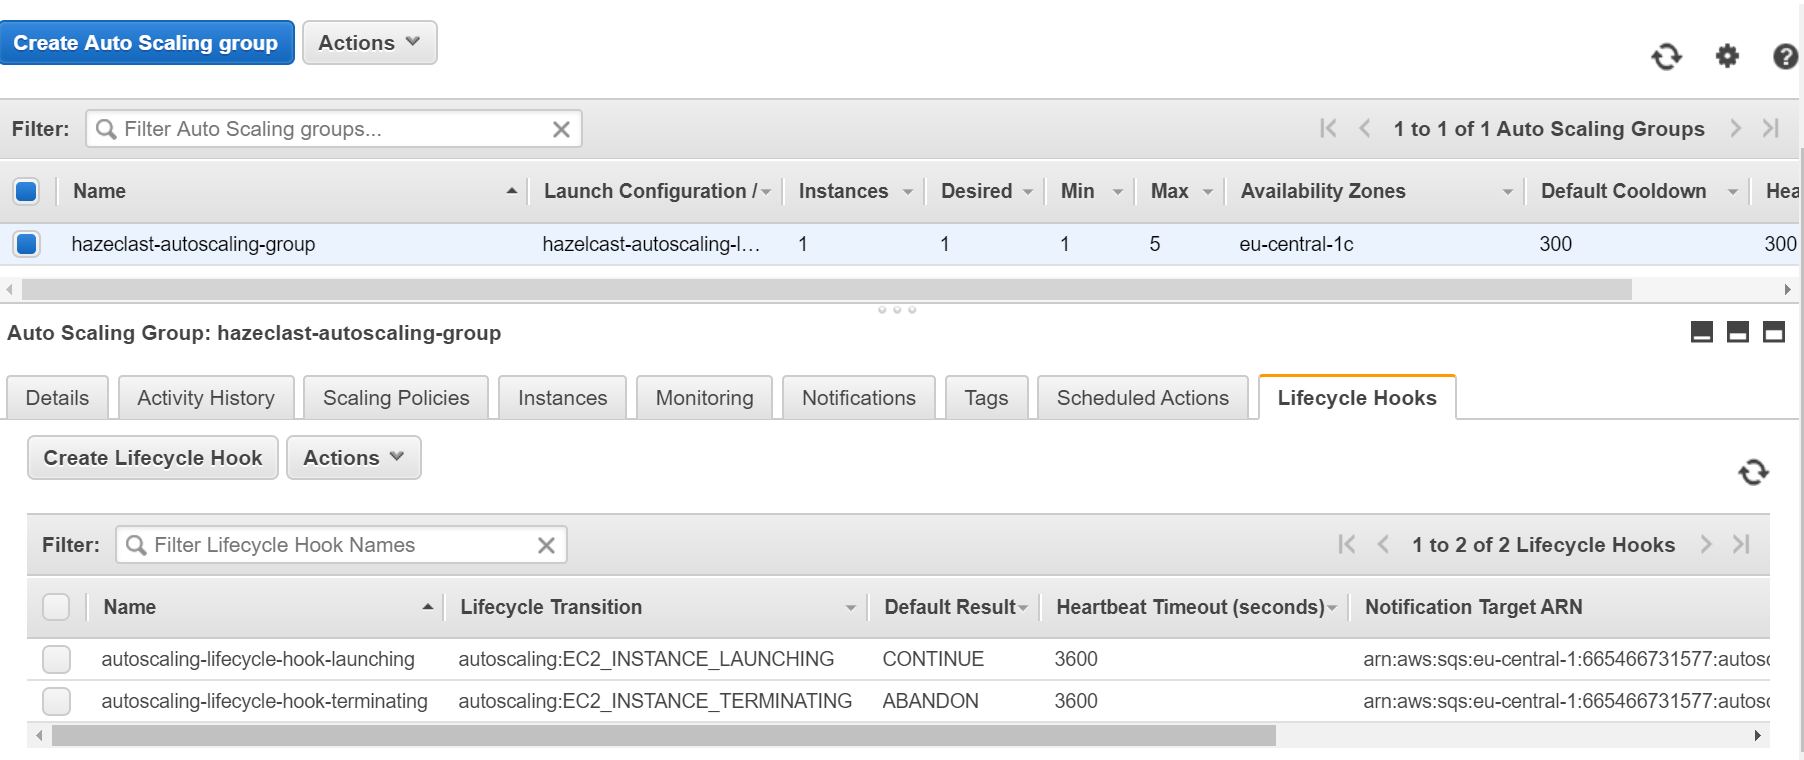
The lifecycle hooks should be visible in the AWS console

Lifecycle Hook Listener Script
The lifecycle_hook_listener.sh script takes one argument as a parameter (AWS SQS name) and performs operations that can be expressed in the following pseudocode.
while true:
    message = receive_message_from(queue_name)
    instance_ip = extract_instance_ip_from(message)
    while not is_cluster_safe(instance_ip):
        sleep 5
    send_continue_message
You can find a sample lifecycle_hook_listener.sh script in Hazelcast Code Samples.
Understanding Auto Scaling
To better understand how the configured Auto Scaling Group works, let’s examine a simple use case. You can follow the flow of operations that happens when AWS scales down the number of Hazelcast instances.
Phase 1: Trigger Auto Scaling
- AWS Auto Scaling Group receives an alarm that the specified metric is exceeded (e.g., the average CPU usage is too low)
- AWS chooses one of the existing instances and changes its state from InService into Terminating:Wait
Terminating:Waitmeans that if there is noCONTINUEsignal afterTIMEOUT(1h by default), the instance is changed back toInServiceTerminating:Waitimplies that there is no new Auto Scaling operations until theCONTINUEsignalTerminating:Waitdoesn’t mean that the instance stops; it’s still running
- Lifecycle Hook “Instance Terminate” sends a notification message to AWS SQS
Phase 2: Wait for Cluster Safe
- Any of the running lifecycle_hook_listener.sh scripts receives the message
- The
lifecycle_hook_listener.shscript waits until the Hazelcast cluster is safe (by periodically healthchecking the Hazelcast instance) - When the cluster is safe,
lifecycle_hook_listener.shsends the CONTINUE signal to the AWS Autoscaling Group
Phase 3: Terminate EC2 Instance
- AWS changes the state of the EC2 Instance from Terminating:Wait into Terminating:Proceed
- The EC2 Instance is terminated
- AWS Autoscaling Group starts to receive new alarms about increasing/decreasing the number of instances
Conclusion
The AWS Auto Scaling solution presented in this post is complete and independent of the number of Hazelcast members and the amount of data stored. Nevertheless, there are also alternative approaches. They are simpler, but may fail under certain conditions. That is why you should use them with caution.
Cooldown Period
Cooldown Period is a statically defined time interval that AWS Auto Scaling Group waits before the next Auto Scaling operation may take place. If your cluster is small and predictable, then you can use it instead of Lifecycle Hooks.
Setting Up
- Set Scaling Policy to Step scaling and increase/decrease always by adding/removing 1 instance
- Set Cooldown Period to a reasonable value (which depends on your cluster and data size)
Drawbacks
- If your cluster contains a significant amount of data, it may be impossible to define one static cooldown period
- Even if your cluster comes back to the safe state quicker than the cooldown period, the next operation needs to wait
Graceful Shutdown
A solution that may sound good and simple (but is actually not recommended) is to use Hazelcast Graceful Shutdown as a hook on the EC2 Instance Termination.
Setting up
Without any autoscaling-specific features, you could adapt the EC2 Instance to wait for the Hazelcast member to shut down before terminating the instance.
Drawbacks
Such solution may work correctly, however is definitely not recommended for the following reasons:
- AWS Auto Scaling documentation does not specify the instance termination process, so you can’t rely on anything
- Some sources (here) specify that it’s possible to gracefully shut down the processes, however after 20 seconds AWS can kill them anyway
- The Amazon’s recommended way to deal with graceful shutdowns is to use Lifecycle Hooks


